
Amazon is devoted to bringing digital services to users around the world. From its digital music services, you can choose Amazon Music Prime and Amazon Music Unlimited. It's easy for you to access millions of songs and thousands of playlists and stations programmed by Amazon's music experts on your devices with an Amazon Prime account or a premium subscription.
When you browse through your library and listen to songs from Amazon, the Amazon Music app can save several contents and data in temporary storage. This temporary storage is called cache which takes up lots of space on your devices. To free up space on your devices, you should clear the cache from time to time. In the following step-by-step guide, we will show you how to clear Amazon Music cache across devices.
Part 1. What Does Clear Cache Mean on Amazon Music?
The cache is a reserved storage space that stores temporary data, aiming to help apps load faster. When you listen to songs in the Amazon Music app, there will store some listening caches on your device. Clearing cache on Amazon Music means that you delete all the temporary data related to the Amazon Music app on your device.
Part 2. How to Clear Cache on Amazon Music for PC/Mac
To clear the cache in the Amazon Music app on your computer, you can follow the different ways to refresh data. Here's how to clear Amazon Music cache on PC or Mac.
Method 1. Sign Out and Sign In
Signing out and signing into the Amazon Music app can start a library resync and refresh data.
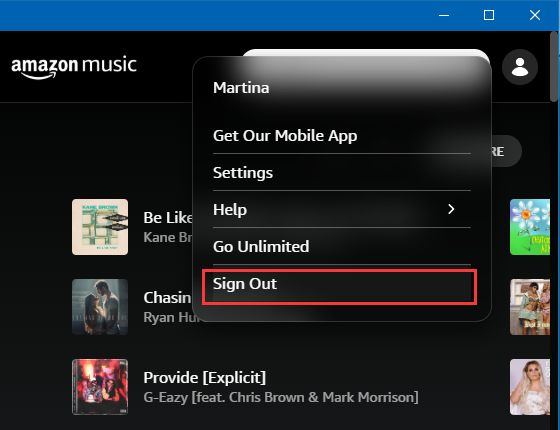
Step 1. Open the Amazon Music app on your computer and click your profile picture in the top right corner.
Step 2. From the drop-down menu, click the Sign Out button to log out of your Amazon Music account.
Step 3. Quit the Amazon Music app, then do the same steps to sign into Amazon Music again.
Method 2. Remove the Data Folder
If you are a subscriber to Amazon Music Unlimited, you can download your liked songs for listening in Offline Mode. Hence, there are many caches of Amazon Music on your computer. Before directly removing the data folder, you can find the location first.
Step 1. Run the Amazon Music app on your computer and click the menu bar > Settings.
Step 2. Scroll down to find Music Management and find the location of Offline Download Location.
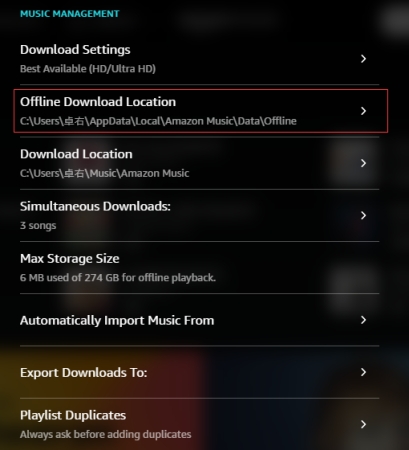
Step 3. After finding the location, you can go to clear the data on your computer.
Or you can directly go to the default folder for Windows or Mac, then start to delete the cache in the Amazon Music app.
Windows: Open a folder and type the address in the search box: user\profile\AppData\Local\Amazon Music\Data.
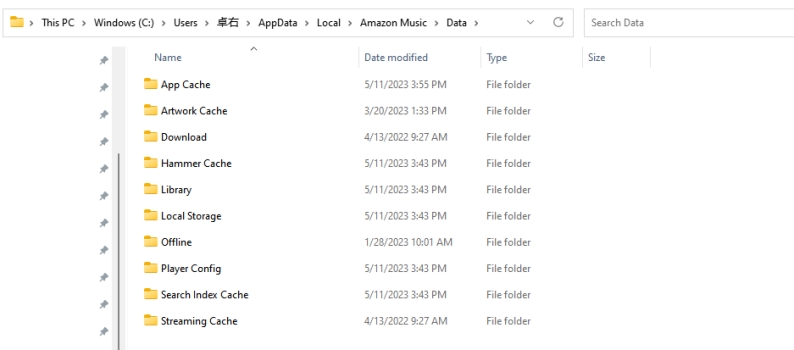
Mac: Open the Finder, enter shift-command-g to open the “go to folder” window, then enter: ~/Library/Application Support/Amazon Music/Data.
Method 3. Reload the Amazon Music App
The final method to clear the cache in the Amazon Music app is to reload the app. Both Windows and Mac users can use the step.
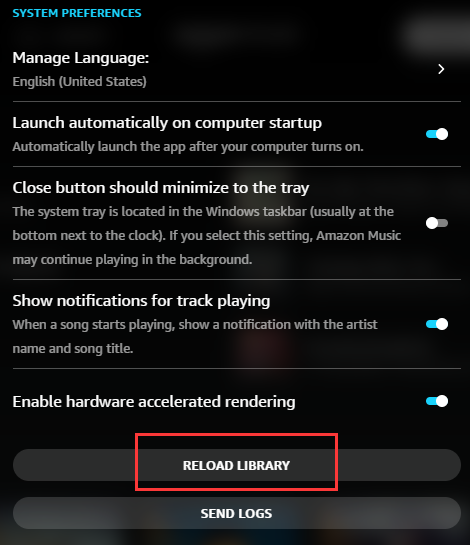
Step 1. Launch the Amazon Music app on your computer and click Profile > Settings.
Step 2. Under Settings, scroll down to the bottom and click the Reload Library button.
Step 3. In the pop-up message, click the Continue button to confirm that you want to delete the cache.
Part 3. How to Clear Cache on Amazon Music for iPhone/Android
You're allowed to directly clear the cache in the Amazon Music app from your Android or Fire tablet. But there is no option to clear the cache of Amazon Music on iOS devices. To clear the Amazon Music cache on your mobile device, you can try the following steps.
Clear Cache in Amazon Music on Android and Fire Tablets
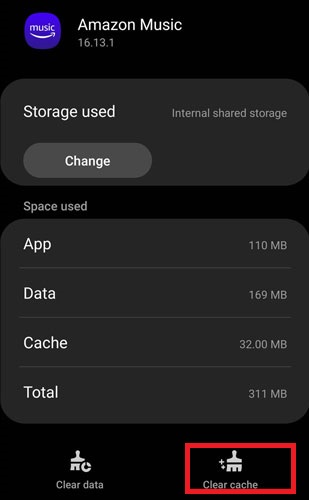
Step 1. Fire up the Amazon Music app and tap the menu icon in the upper right corner.
Step 2. Tap Settings, scroll down to the Storage section, then tap Clear Cache.
Clear Cache in Amazon Music on iPhone and iPad
Here we'll show you how to clear some cache of Amazon Music on iPhone and how to delete the Amazon Music app to clear the cache completely.
Option 1. Clear Some Cache of Amazon Music
Step 1. From a web browser on an iPhone or iPad, open music.amazon.com/showDebugOptions.
Step 2. Select Clear Lyrics, then tap Clear Image Cache.
Option 2. Delete Amazon Music App to Clear All Caches
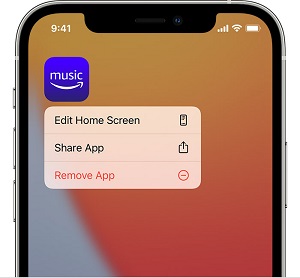
Step 1. Touch and hold the Amazon Music app on the screen of your iPhone.
Step 2. Tap the Remove App option, then tap Delete App > Delete to confirm.
art 4. How to Store Amazon Music to SD Card/USB Drive
Clearing the cache for the Amazon Music app can free up some space on your device. But deleting your cache will clear your downloads. All those songs downloaded in the Amazon Music app will be deleted at the same time. Since Amazon Music is a subscription-based service, you are only able to keep cache files for offline listening.
So, in this case, once clearing the cache in the Amazon Music app, your offline listening will be affected. You'll find it troublesome having to download songs again. Before downloading Amazon Music songs, you can choose to store Amazon Music on an SD card on an Android device. But for other users, here we do recommend a third-party tool, that is, TunesMake Streaming Audio Recorder.
TunesMake Streaming Audio Recorder is a top-rated music converter for Amazon Music. With this tool, you can remove DRM from Amazon Music while keeping the lossless audio quality and ID3 tags at a super faster speed of 5×. It can enable you to download songs from Amazon Music to universal files. Then you can store Amazon Music songs on other places like an SD card or a USB drive.

Streaming Audio Recorder –
Download Streaming Music to MP3 on PC and Mac
- Unlimitedly download streaming music songs, playlists, and podcasts
- Losslessly convert streaming music to MP3, M4A, M4B, WAV, FLAC, and AIFF
- Remove DRM protection from many streaming music platforms
- Convert streaming songs with original sound quality and ID3 tags kept
Security Verified. 100% Clean & Safe.
Step 1
Add Amazon Music Playlists to the Converter

The first up is pulling up TunesMake Amazon Music on your computer and the Amazon Music app will be opened soon. Then choose the playlist you like on the Amazon Music app, click the three-dot icon, and select Share Playlist. Next, click the Copy Link button and paste the link on the search bar of TunesMake. Finally, hit the + icon to add Amazon Music.
Step 2
Configure the Output Audio Parameters
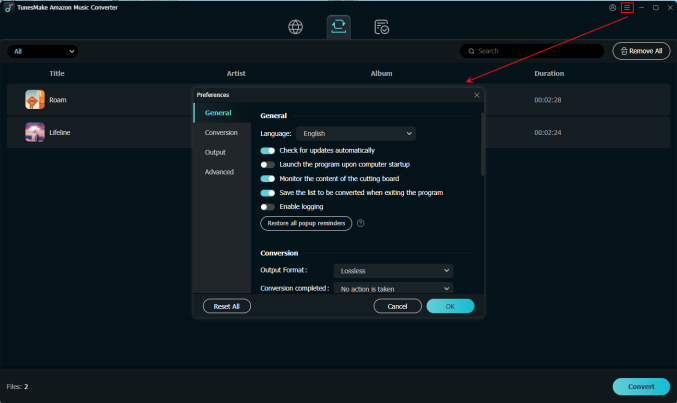
The next is to set the parameters of the output audio. You'll click the menu bar and select the Preferences options to set the output audio parameters. In the Advanced window, you can choose the output format as MP3 or the other five audio formats. For better audio quality, you need to continue to adjust the bit rate, sample rate, and channel. Click the OK button to save.
Step 3
Start to Convert Amazon Music Songs to MP3
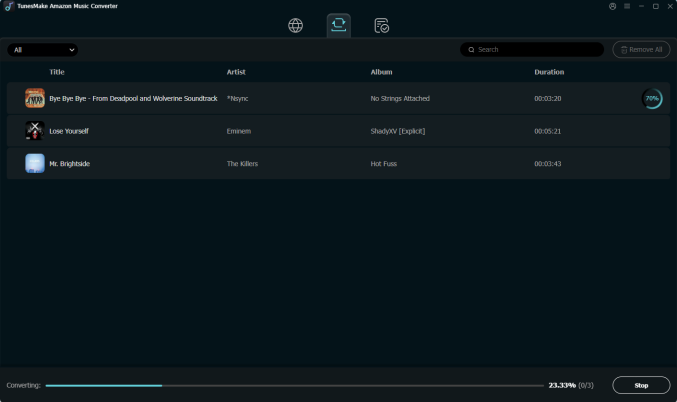
To download Amazon Music tracks, you just need to click the Convert button at the bottom right corner of the Add window and the playlist will start to download. Then depending on how many songs you want to download, it will take a while to convert Amazon Music songs to MP3. Once saved, the playlist will be accessible from your computer. You can click the Converted icon on the bottom to browse the converted tracks.
Conclusion
And voila! This is how to clear cache on Amazon Music from your computers and mobile devices above. If you want to free up space on your devices, you can try performing those steps. Clearing added music cache in Amazon Music is not so hard, right? And there is a way to help you store Amazon Music in other places, and just use TunesMake Streaming Audio Recorder. Have a try, and you'll find it out.
Related Articles


A professional writer at TunesMake, crafts in-depth tutorials, practical tips and expert advice focusing on streaming music, technology, and more.
- 1
- 2
- 3
- 4
- 5
- 6
- 7