







 Store
Store


If you want quick access to your favorite playlists, albums, and playback controls without opening the full app every time, adding an Amazon Music widget to your device is the best solution. While adding a widget seems simple, steps varies depending on whether you are using Android, iOS, or a desktop computer. In this guide, you will learn how to set up the Amazon Music widget on all major platforms and troubleshoot common issues when the widget stops working.

Part 1. What Can the Amazon Music Widget Do?
The official Amazon Music widget acts as a mini player on your device's home screen. Depending on your operating system and chosen widget size, it provides several convenient controls.
1️⃣ One-Tap Playback: Play, pause, or skip tracks with a single tap directly from your screen.
2️⃣ Now Playing Display: View album artwork, song titles, and artist names at a glance.
3️⃣ Quick Navigation: Tap artwork or track info to open the Amazon Music app directly to the active song or playlist.
4️⃣ Recent History: Larger widget layouts display recently played playlists, stations, or albums for fast access.
Part 2. How to Add the Amazon Music Widget on Android
Android offers support for Amazon Music widgets, allowing you to choose from multiple sizes to fit your home screen layout. Here's how to add the Amazon Music widget on Android devices.
Add Amazon Music Widget to the Android Home Screen
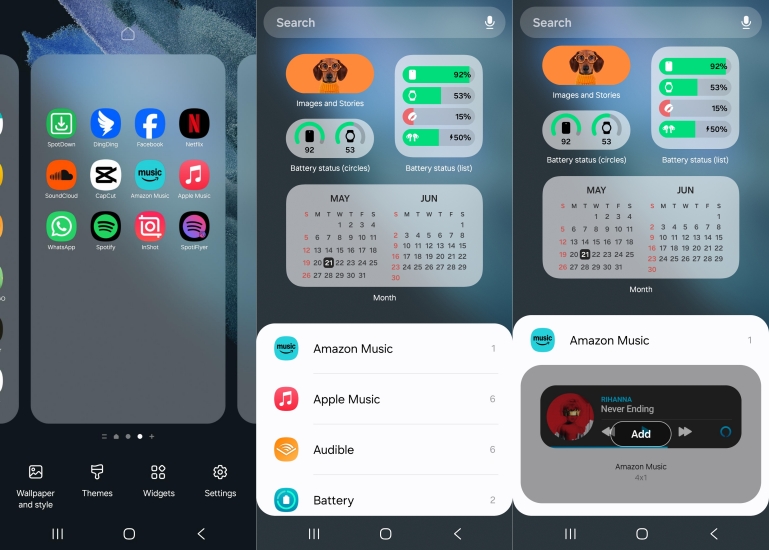
Step 1. Long-press an empty area on your Android home screen until the screen customization menu appears.
Step 2. Tap Widgets.
Step 3. Scroll through your installed apps or use the search bar to locate Amazon Music.
Step 4. Tap the Amazon Music drop-down menu to view available widget styles and sizes.
Step 5. Touch and hold your preferred widget layout, drag it to your desired location on the screen, and release it.
Step 6. Tap anywhere outside the widget to lock it in place.
Manage Amazon Music Controls on the Android Lock Screen
Modern Android operating systems handle lock screen playback using system-level media notifications rather than traditional lock screen widgets.
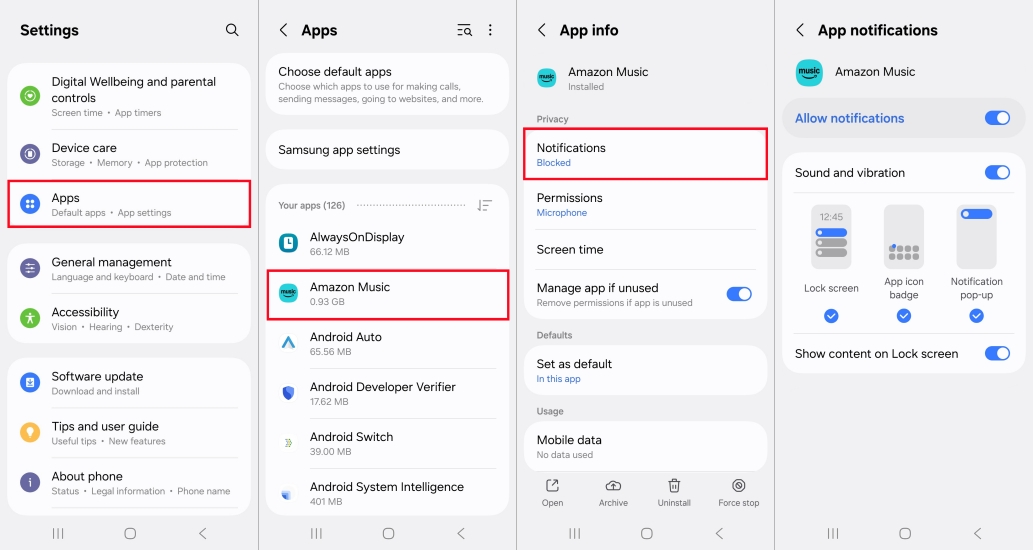
Step 1. Open your phone's Settings app.
Step 2. Navigate to Apps > Amazon Music.
Step 3. Tap Notifications and ensure Allow notifications is turned on.
Step 4. Turn on Show content on Lock screen.
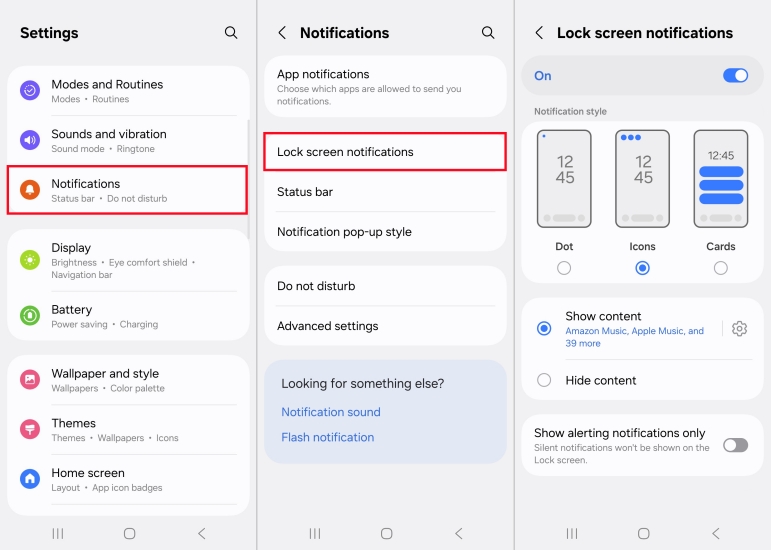
Step 5. Go back to Settings > Notifications.
Step 6. Tap Lock screen notifications and set it to Show content.
Now, whenever Amazon Music is playing, a media control card will automatically display on your Android lock screen.
Part 3. How to Create an Amazon Music Widget on iOS
Apple users cannot directly add widgets to their iOS Home Screen as Android users. If you want a widget that launches a specific Amazon Music playlist or album with one tap, you can create a custom Shortcut. Here's how to create an Amazon Music widget on iOS devices.
Step 1: Get Your Amazon Music Content Link
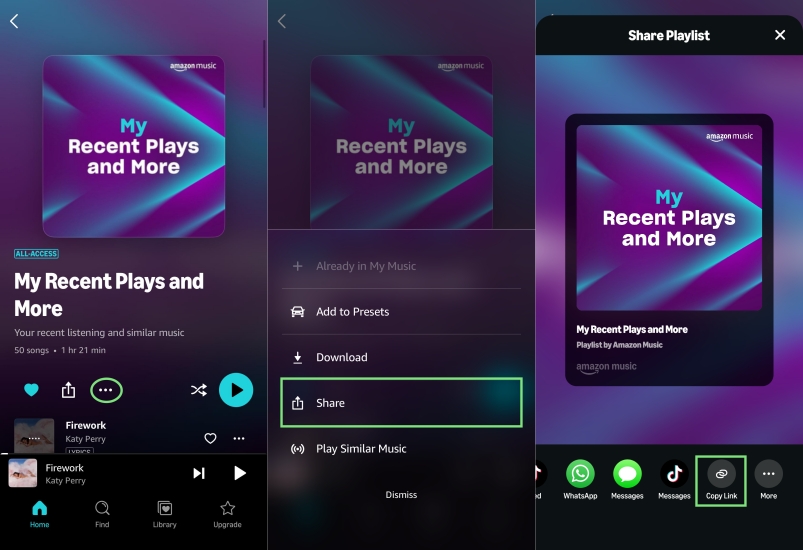
1. Open the Amazon Music app on your iPhone.
2. Navigate to the playlist, album, or track you want to target.
3. Tap the Three Dots (...) or Share icon and select Copy Link.
Step 2: Configure the Deep-Link URL
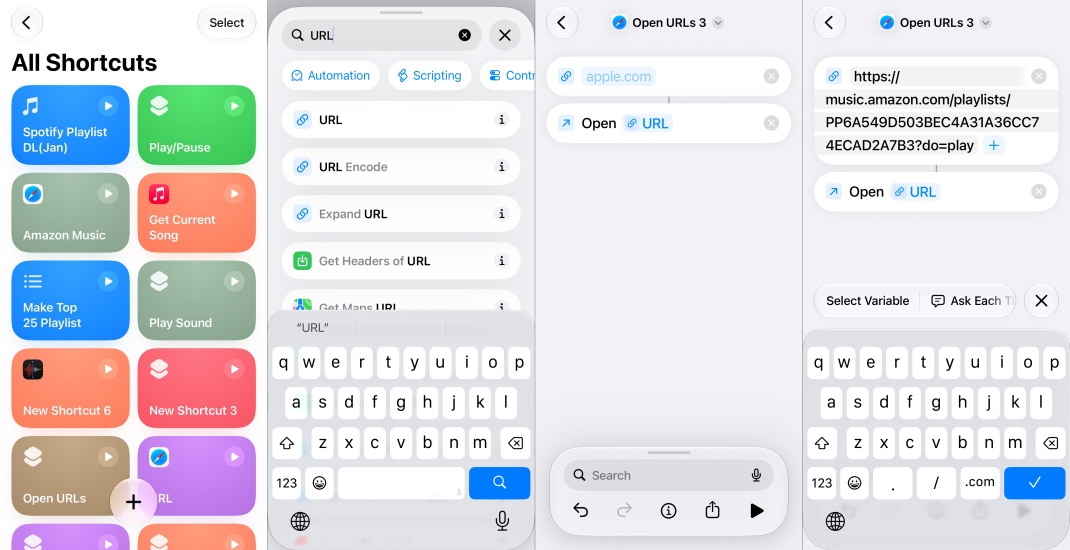
1. Open the built-in Shortcuts app on your iPhone.
2. Tap the + (Add) icon in the top-right corner to create a new shortcut.
3. In the search bar at the bottom, type URL and tap the URL action to add it.
4. Paste your copied link into the text field.
5. Delete everything following the ? symbol in the URL and replace it with do=play.
Step 3: Set the Open URL Action
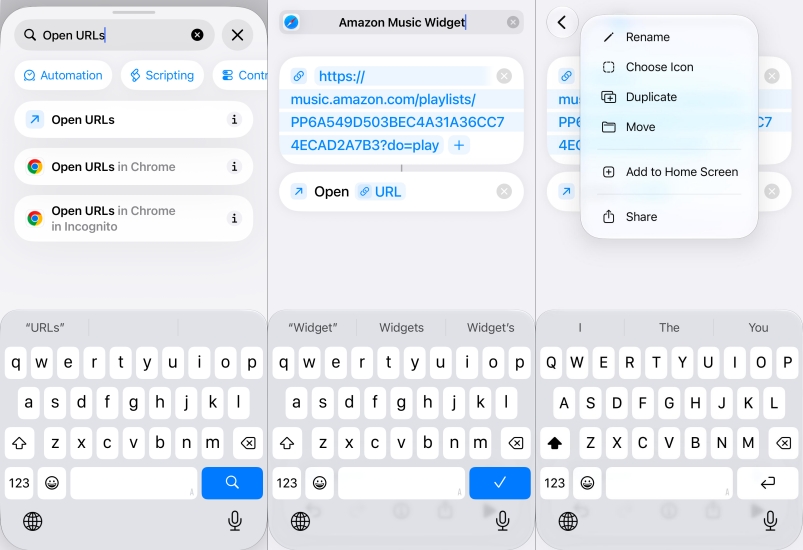
1. Tap the bottom search bar again and search for Open URLs.
2. Tap Open URLs to add the action below your URL block.
3. Tap the default shortcut name at the top to give it a custom title and icon.
4. Tap Done in the top-right corner to save.
Step 4: Add the Shortcut Widget to Your Home Screen
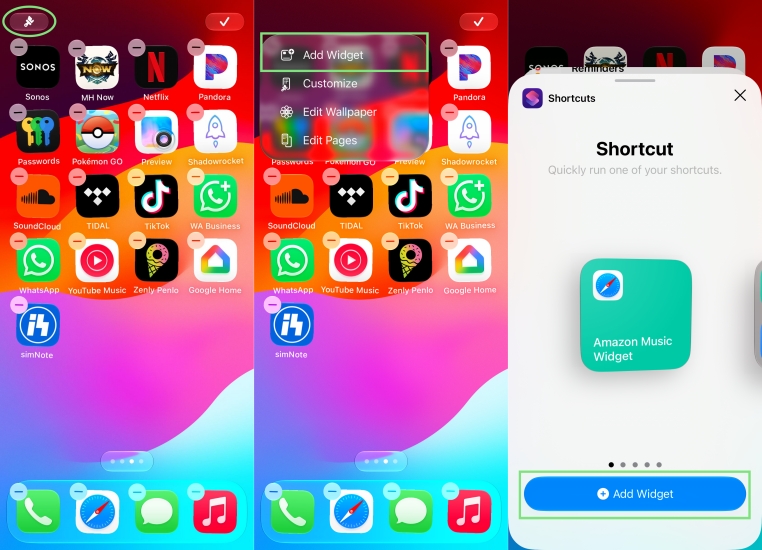
1. Go to your iOS Home Screen, touch and hold an empty area until the icons begin to jiggle.
2. Tap the + icon in the top-left corner.
3. Search for Shortcuts and select your preferred widget size.
4. Tap Add Widget, place it on your screen, and tap Done.
Part 4. How to Get an Amazon Music Widget on Windows & Mac
Like iOS, neither Windows nor macOS includes a standalone Amazon Music OS desktop widget. However, you can achieve similar functionality using built-in OS tools and third-party options.
Option 1. Use the Amazon Music Desktop Mini Player
The official Amazon Music desktop application for Windows and Mac includes a built-in Mini Player that floats above other windows.
Step 1. Open the Amazon Music app on your PC or Mac.
Step 2. Start playing a track.
Step 3. Click the Mini Player icon near the playback controls at the top or bottom of the window.
Step 4. Drag the Mini Player to any corner of your desktop for quick access while working.
Option 2. Use Audio Widgets via Amazon Music Converter
If you rely on customized platforms such as Rainmeter, Windows Media Player widgets, or third-party menu bar players that cannot interface directly with encrypted streaming apps, DRM protection presents a technical barrier. Streaming tracks cannot be rendered by external, non-official desktop widgets out of the box.
To work around this constraint, TunesMake Amazon Music Converter allows users to download and convert Amazon Music tracks, playlists, or albums into DRM-free local audio files such as MP3, FLAC, or WAV while preserving original sound quality and ID3 tag metadata. Once saved locally to your drive, these audio files can be imported into any media player or desktop widget suite like Rainmeter or custom desktop widgets that require local file paths to display playback controls and album artwork on your computer.

Streaming Audio Recorder –
Download music from Amazon Music unlimitedly
- Download songs, albums, and playlists from Amazon Music
- Convert Amazon Music to MP3, M4A, M4B, WAV, FLAC, and AIFF
- Remove DRM protection from Amazon Music completely and safely
- Preserve the original audio quality and ID3 tags for management
- Support downloading music from 10 popular streaming platforms
Security Verified. 100% Clean & Safe.
Step 1 Add Songs from Amazon Music to Convert
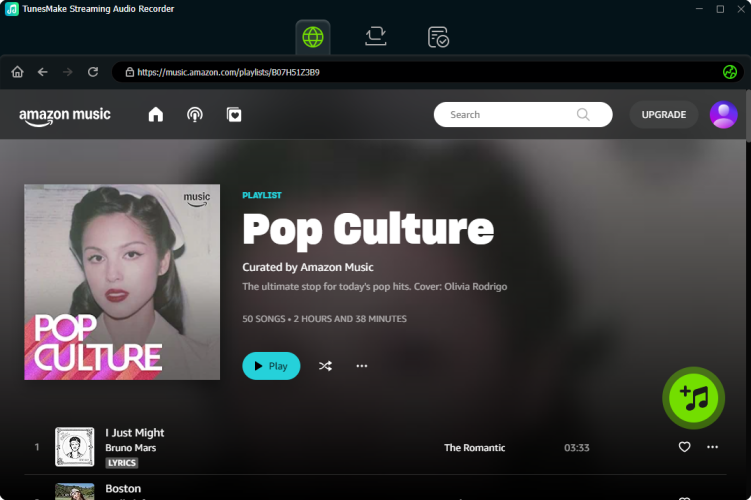
Open TunesMake Streaming Audio Recorder, and it will show a list of streaming platforms on the main dashboard. Simply click Amazon Music, then the built-in Amazon Music web player will automatically load. Go to log into with your account and select any content to download. Just click the + button to add them into the conversion list.
Step 2 Set the Output Formats and Preferences
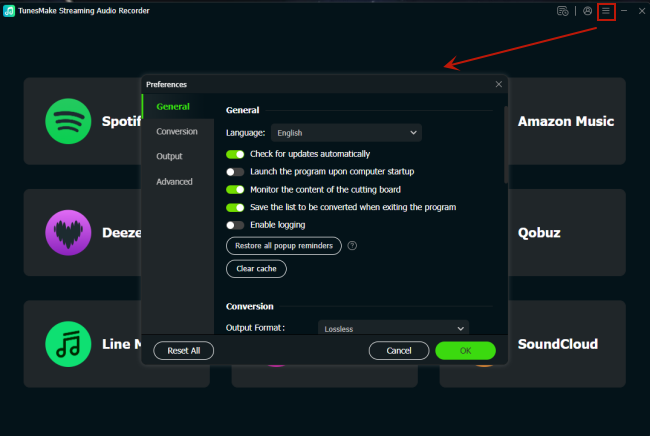
Go to the Settings button at the bottom-left corner. Then select Preferences and switch to the Conversion tab. Here you can change the output format, sample rate, bit rate, and channel. We suggest you keep the default MP3 format.Moreover, you are able to click the Output panel to change the output location.
Step 3 Download and Save Amazon Music Locally
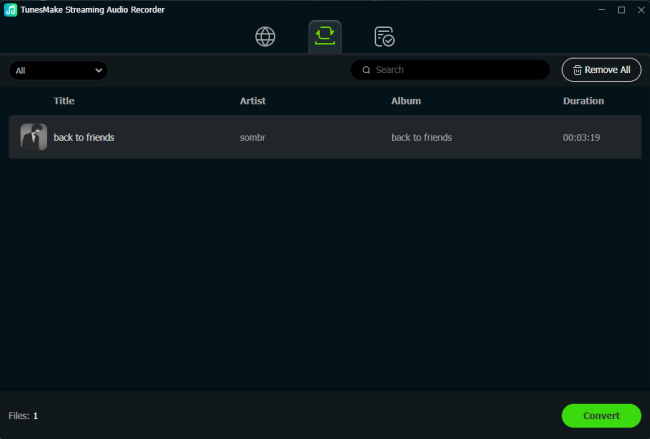
Once everything is ready, click the Convert button to start the conversion. When done, all selected Amazon Music songs are saved to your computer. To browse all the downloaded Amazon songs, click the History button at the left panel. You can also use the search icon to locate all converted songs in the local drive.
Step 4 Set the Amazon Music Widget on PC
The converted Amazon Music songs are saved to your computer locally. You can set one Amazon Music Widget on your Windows PC or Mac using the built-in media player.
On Windows PC:
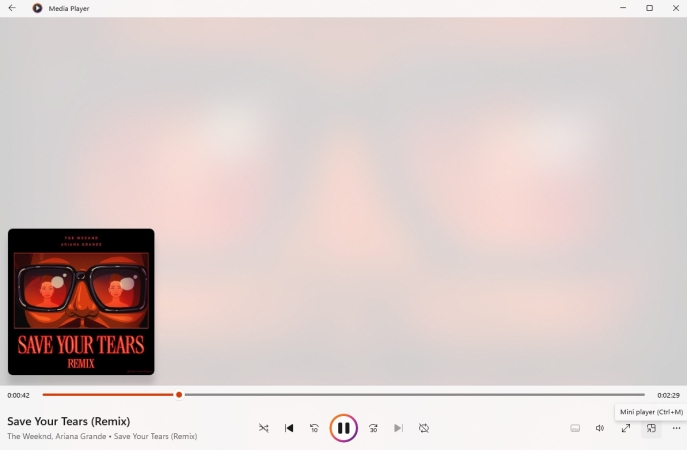
1. Launch Media Player and select Add Folder to find all the converted Amazon Music songs.
2. Pick any content to play and click the Mini Player button on the Now Playing window.
On Mac:

1. Open the Music app and select File from the Apple menu.
2. Choose Import to open Finder and find the Amazon Music files to upload.
3. Start playing your Amazon Music track.
4. From the Apple menu, click Window > Switch to Mini Player.
Part 5. How to Fix Amazon Music Widget Not Working or Missing
When the Amazon Music widget is not showing up, frozen on a single song, or completely blank, the issue is usually caused by restricted background permissions, corrupted cache files, or system sync delays. Follow these steps in order to resolve the problem.
Fix 1: Remove and Re-Add the Widget (Android)
When the official Amazon Music widget not working, re-establishing the widget connection resets system layout caches.
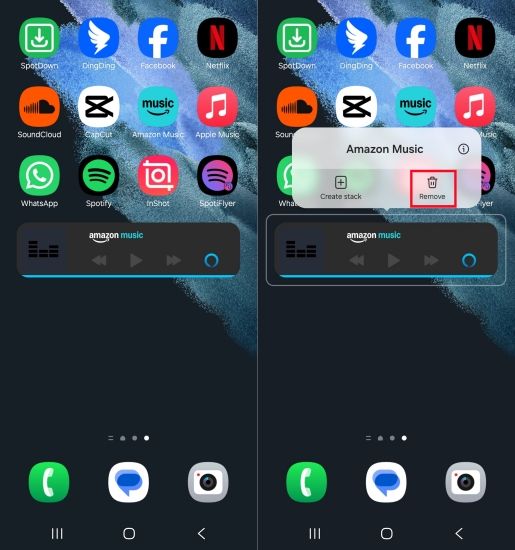
Step 1. Long-press the frozen or broken Amazon Music widget on your screen.
Step 2. Select Remove Widget.
Step 3. Restart your phone to clear background system memory.
Step 4. Re-add the Amazon Music widget following the setup steps above.
Fix 2: Clear Amazon Music App Cache
Corrupted cache files frequently cause the Amazon Music widget to show a black box or fail to update track artwork.
On Android:
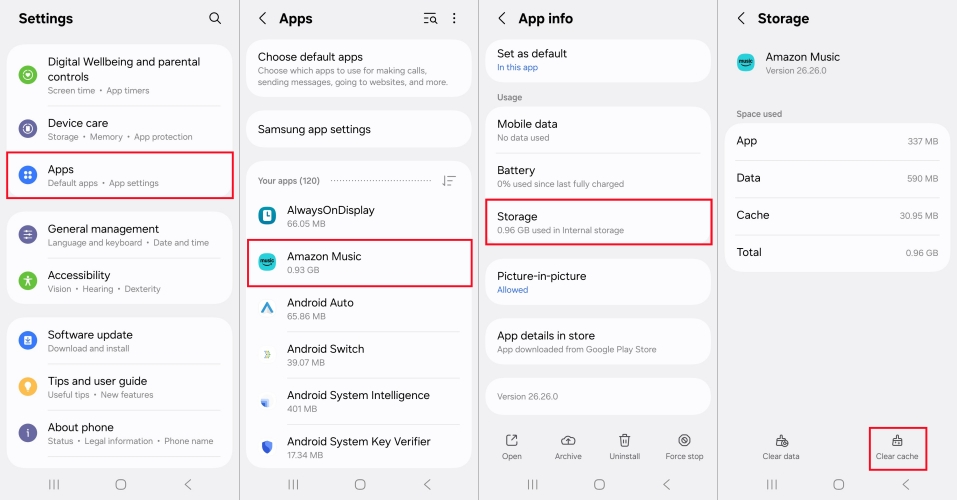
Step 1. Navigate to Settings > Apps and tap Amazon Music.
Step 2. Tap Storage and select Clear Cache.
On iOS:
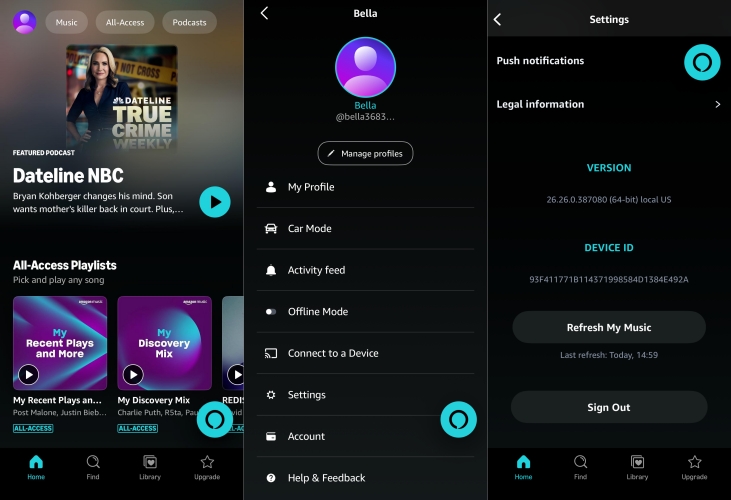
Step 1. Launch Amazon Music and tap your profile image.
Step 2. Tap Settings and scroll down to tap Refresh My Library.
Fix 3: Turn Off Battery Saver Restrictions
Aggressive OS battery management can kill background tasks, preventing the widget from updating when songs change.
On Android:
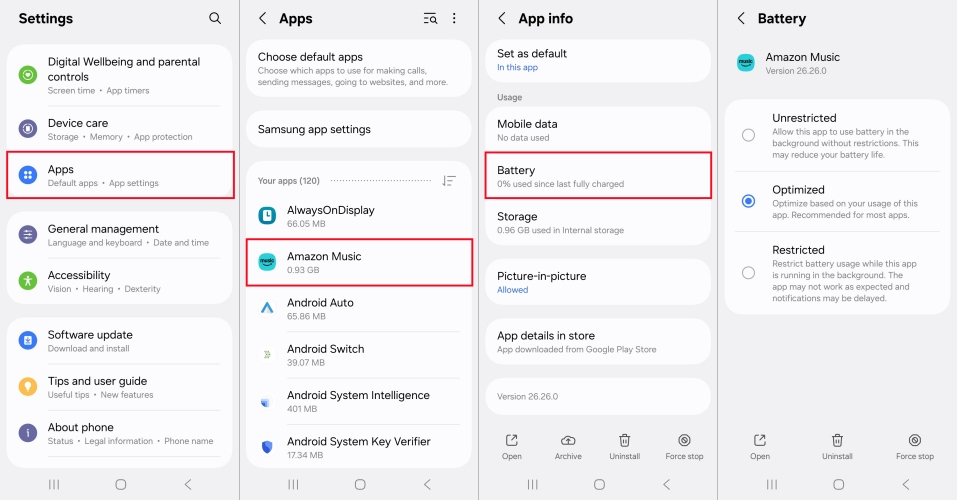
Step 1. Go to Settings > Apps > Amazon Music > Battery.
Step 2. Choose Unrestricted or Optimized.
On iOS:
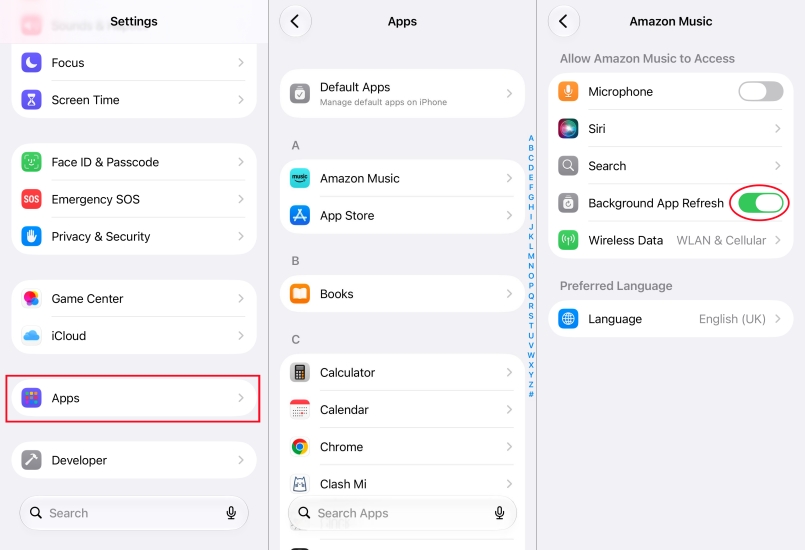
Step 1. Head to Settings > General > Background App Refresh.
Step 2. Ensure Amazon Music is toggled ON.
Fix 4: Verify App and System Updates
If an OS update changes widget protocols, outdated app versions may stop communicating with the home screen system.
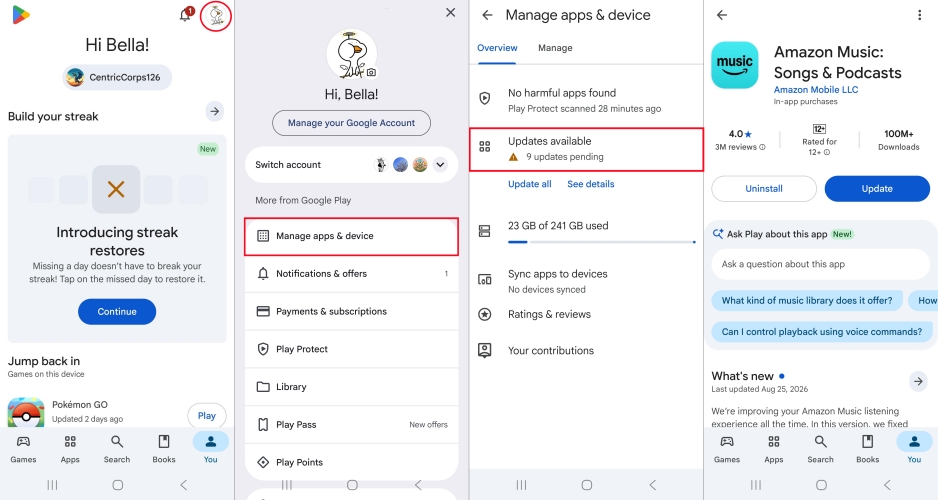
Step 1. Open the Google Play Store or Apple App Store.
Step 2. Search for Amazon Music and tap Update if a new version is available.
Step 3. Check your device settings for pending software updates and install them.
Part 6. Conclusion
Setting up an Amazon Music widget brings playback controls and track information straight to your home screen. While Android devices offer direct home screen widgets out of the box, iOS and desktop users can rely on other workarounds to get an Amazon Music widget. By applying the proper background permissions and keeping your app updated, you can enjoy fast, uninterrupted access to your favorite music on any device.
Related Articles



An experienced freelance writer at TunesMake, specializes in using various streaming services from Spotify, Apple Music, to Amazon Music, and more other platforms.
- 1
- 2
- 3
- 4
- 5
- 6
- 7
 Leave Your Comment
(0)
Leave Your Comment
(0)

 Download Center

