
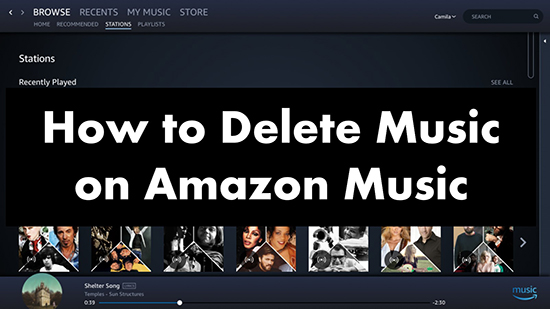
When it comes to music streaming, Amazon Music stands out as a prominent service. Offering access to an extensive music library through tiers like Amazon Music Free, Prime, and Unlimited, Amazon Music empowers users to discover and enjoy music. In addition, it supports users in curating personalized playlists and making unique music libraries. You can shape your own music world with all your preferred songs and playlists. However, as your tastes evolve, you might find yourself wanting to declutter and remove songs, playlists, or albums that you no longer enjoy. This article will teach you how to delete Amazon Music on different devices by walking you through all the necessary steps, as well as provide strategies for effectively managing your cherished music tracks.
Part 1. How to Delete Amazon Music Songs/Playlists
Amazon Music offers convenient access and library management across both mobile and computer platforms. If you are looking to delete some old songs or playlists on your collection, the steps in this section can help.
1.1 Delete Songs from Amazon Music
Step 1. Go to the official Amazon Music or web player on your device and log in.
Step 2. Select Library > Music > Songs.
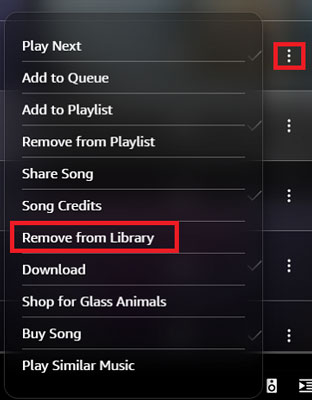
Step 3. Now you can find the Amazon Music song you want to delete. Then, select the three-dots icon next to it.
Step 4. Choose Remove from Library.
1.2 Delete Amazon Music Playlist
Step 1. Launch the Amazon Music app on your device.
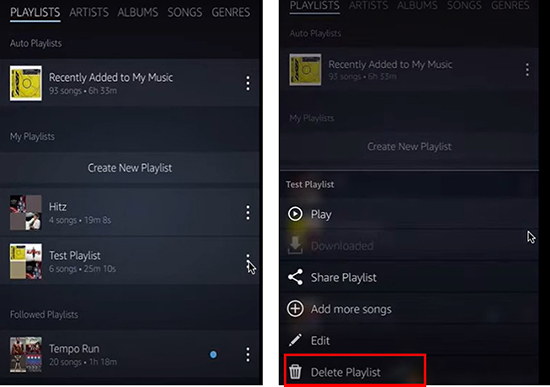
Step 2. Then, go to Library > Music > Playlists.
Step 3. Tap the three vertical dots of the playlist you want to delete.
Step 4. After that, you can delete it by clicking Delete Playlist > Delete.
1.3 Delete a Song from Your Amazon Music Playlist
Step 1. Head to the Amazon Music app on your mobile phone or computer.
Step 2. Navigate to Library > Music > Playlists.
Step 3. After that, you should find the playlist that you want to manage and delete songs. Tap it to enter the detailed page.
Step 4. Locate the song you want to delete from this playlist.
Step 5. Then, select the three-dots icon and hit on the Remove from Playlist option.
Part 2. How to Delete Downloaded Amazon Music Songs
Downloaded music can quickly eat up storage, especially if you frequently download songs or like to save high-fidelity music offline. Luckily, Amazon Music allows you to delete downloaded music files without removing them from your music library.
Step 1. Open the Amazon Music app and log in to your account.
Step 2. Head to your Library and select Downloaded at the top.
Step 3. Here you can see a list containing all the downloaded songs on your device.
Step 4. Find the song you want to delete and click the three-dots icon next to the title.
Step 5. Select Delete and you are done.
Part 3. How to Delete Amazon Music History
One popular feature of Amazon Music is Recently Played, through which, you can see the songs you've recently streamed. It is a useful feature to help you revisit a tune you enjoyed. However, you might occasionally want to clear the listening history for private reasons. By the following steps, you can learn how to delete and clear individual tracks in your recently played list.
Step 1. Fire up the Amazon Music app on your device.
Step 2. Go to your Library and select the Recents option at the top.
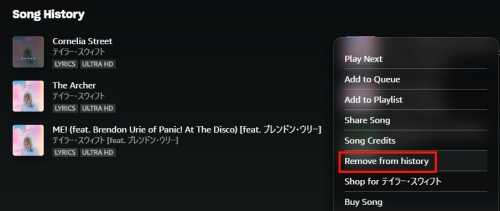
Step 3. Here you can see all the songs you listened to recently. Find the song you want to delete from the history.
Step 4. Select the More options next to it and click Remove from history.
Part 4. Bonus: How to Download Amazon Music Locally & Keep Forever
Deleting music from Amazon Music can help save space and organize your music library. It's not a difficult process as long as you follow the tutorial above. If you want to manage your digital music library better, one great choice is to download Amazon Music songs as local music files offline. Then, you can permanently store them on your USB drive or other devices – even if they are no longer available through Amazon Music. To achieve this goal, you will need the help of a powerful third-party music converter. Try TunesMake Streaming Audio Recorder!
Thanks to its advanced decryption technology, TunesMake Streaming Audio Recorder can help you remove Amazon Music DRM protection and convert Amazon Music Prime/Unlimited songs, playlists, albums, and podcasts to normal audio formats, including MP3, M4A, M4B, WAV, FLAC, and AIFF. Once you use it to save your music collection locally, you can freely play it anytime, on any device, even without the Amazon Music app. Beyond that, the TunesMake software automatically keeps high-quality sound and ID3 tags to ensure your offline music experience. It's a smart solution for those who want more control over their music library.

Streaming Audio Recorder –
Download Streaming Music to MP3 on PC and Mac
- Unlimitedly download streaming music songs, playlists, and podcasts
- Losslessly convert streaming music to MP3, M4A, M4B, WAV, FLAC, and AIFF
- Remove DRM protection from many streaming music platforms
- Convert streaming songs with original sound quality and ID3 tags kept
Security Verified. 100% Clean & Safe.
Step 1
Drag and drop Amazon Music songs to the TunesMake software
Click the Free Download button above to install the TunesMake Streaming Audio Recorder on your Windows or Mac computer. Then, launch it and sign in to your account. Navigate to your Library and find the song you want to download. To add it to the TunesMake conversion list, you just need to drag and drop it to the Add icon at the bottom.
Step 2
Customize the audio output formats
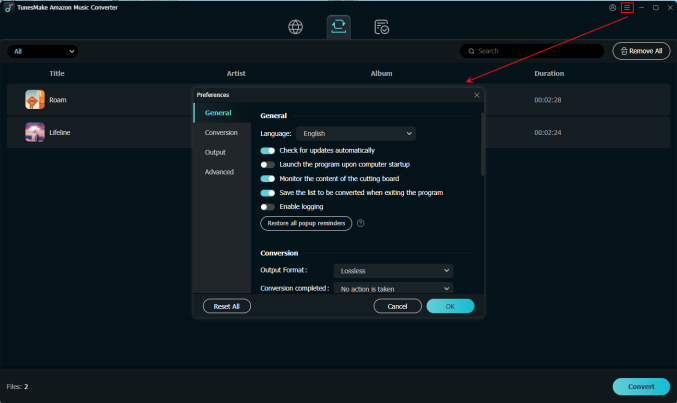
After loading all the songs you like, you can now set the audio settings as you wish. Simply click the menu icon at the top. In the new pop-up, select Preference > Convert. Then, you can pick one audio format you like. MP3 is recommended since it is compatible with most devices. You can also change other settings, like bit rate, sample rate, and channel.
Step 3
Download Amazon Music songs locally
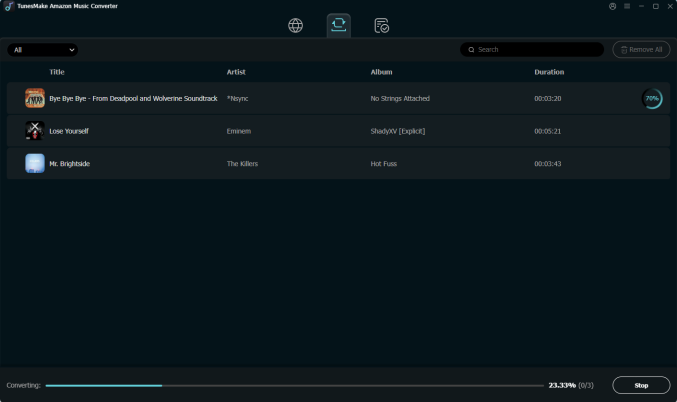
To begin the downloading and converting process, you just need to click the Convert button and wait for a while. Once done, you just need to click the Converted icon at the top. Then, you can see all the downloaded DRM-free music files. Feel free to listen to them directly within the TunesMake software via its inner player or transfer them to other devices for offline playback.
Part 5. FAQs about Deleting Amazon Music
Q1: Why does Amazon Music keep deleting my downloads?
A: When your device doesn't have enough storage space, Amazon Music may delete your downloaded songs automatically. Another possibility of Amazon Music deleting your song is some issues with your account. For example, your account violates its terms of service. Sometimes, it's the problem with the app itself. You can try to update the app.
Q2: Can I delete purchased Amazon Music songs?
A: Of course, yes. You just need to remove the song from Cloud by clicking More options > Delete from Cloud. You should notice that paid music removed from your library will need to be purchased again from the digital store.
Q3: Why can't I delete songs from Amazon Music?
A: If you can't delete songs from Amazon Music, you can first try to restart or update the Amazon Music app on your device. Also, it's necessary to check the Internet connection and clear Amazon Music cache.
Q4: Does deleting music free up storage on my device?
A: Yes, removing downloaded songs will free up space on your mobile or tablet. Streaming-only tracks do not take up storage.
Q5: Can I delete my Amazon Music account?
A: To delete your Amazon Music account, you need to go to the Amazon Music website. Select Account & Settings > Amazon Music Settings > Your Amazon Music Subscription > Cancel Subscription.
Final Thoughts
Keeping your Amazon Music library tidy can improve your user experience and help manage device storage effectively. Whether you are accustomed to using Amazon Music on your mobile device or computer, this article can help you delete Amazon Music songs/playlists easily. If you ever feel limited by the platform's restrictions, remember that tools like TunesMake Streaming Audio Recorder offer a flexible way to download and enjoy your favorite tracks offline.
Related Articles


An experienced freelance writer at TunesMake, specializes in using various streaming services from Spotify, Apple Music, to Amazon Music, and more other platforms.
- 1
- 2
- 3
- 4
- 5
- 6
- 7