
Last.fm is a global music service that allows you to track your music listening stats. The one factor that separates it from other similar tools is that it focuses on your personal music taste or preferences. Many people are fond of using this tool to scrobble with their music streaming services. Recently, some people have been looking for a method to connect Tidal to Last.fm. So, does Tidal work with Last.fm? Let me tell you, the answer is positive. Thanks to the official Tidal Last.fm integration, you can easily make a connection between them and scrobble your Tidal listening stats. If you still have no idea how to make the connection, don’t miss this post! We will walk you through two easy ways to access and add Tidal stats to Last.fm. Once read, you’ll find it’s just a piece of cake to connect. See it below.
Part 1. How to Connect Tidal to Last.fm on Mobile/Desktop
Since Last.fm and Tidal have built a partnership, Last.fm is allowed to access your listening history and summarize it, then create a special profile. You can easily connect within the Tidal app, as there is a connect button within the app directly. Please follow the steps below to connect Last.fm to Tidal.
Connect Tidal to Last.fm on Android/iPhone
Step 1. Open the Tidal mobile app on your device and log into your Tidal account.
Step 2. From the Home screen, tap the gear icon at the upper-right corner of the screen to enter Settings.
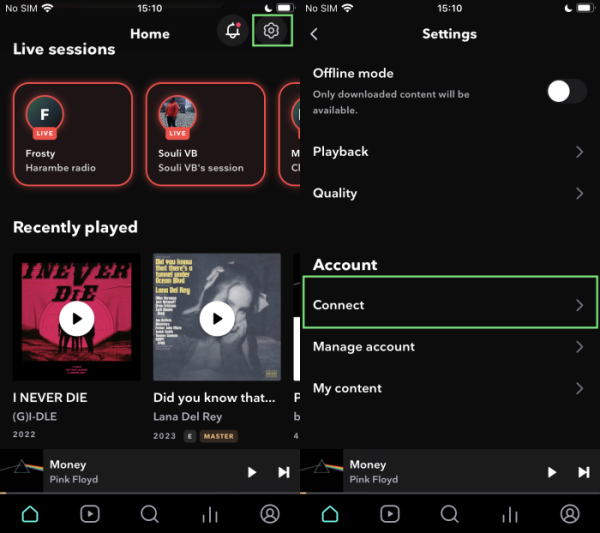
Step 3. Select the Connect panel under the Account section. Here you’re able to see the services you can connect to.
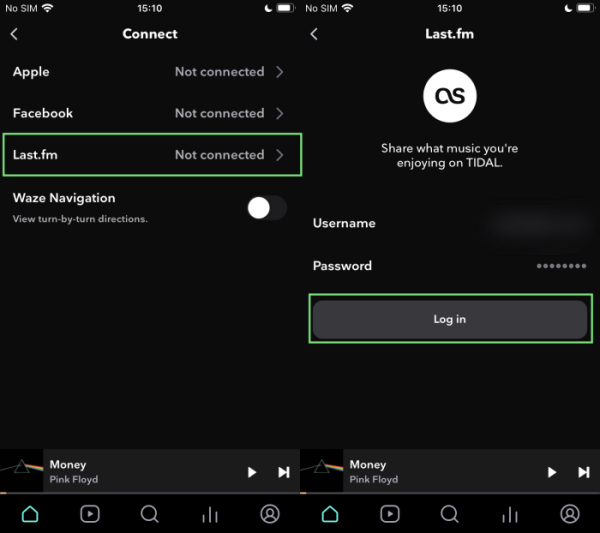
Step 4. Find the Last.fm and tap it to connect. It will redirect you to another page, here just confirm the account information and tap login to connect.
Step 5. Once the connection is over, you can share what you’re listening to on Tidal to your Last.fm account.
Connect Tidal to Last.fm on Desktop
Step 1. Launch the Tidal app on your desktop or open the Tidal web player through any browser, then log into your Tidal account.
Step 2. From the left side menu, click the three-dot icon and select Settings from the drop-down menu.
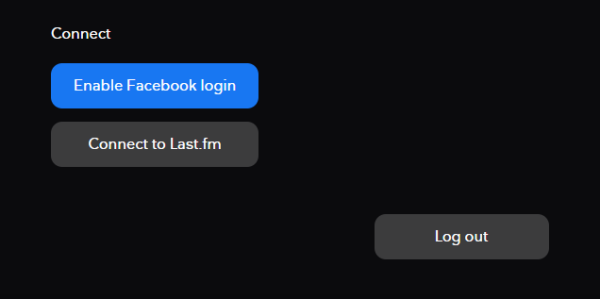
Step 3. In the next view, switch to Account and scroll down to the bottom of the Connect section.
Step 4. Here are two options available for you, click the Connect to Last.fm button to link together.
Step 5. You’ll be redirected to the Last.fm login page. Enter your account credentials to connect.
Part 2. How to Fix Last.fm Not Scrobbling Tidal
Scrobbling through tidal isn’t working. Wonder if it’s a tidal issue or a last.fm issue. I was wondering if anyone else is having issues today as well.”
— A Tidal User in Reddit.As you can see a lot of complaints about Tidal Last.fm not scrobbling issue, it is very common and frequently happened, according to most people. This has largely impacted our normal usage to track music listening stats. Don’t worry. There are several fixes below you can apply under different circumstances.
Fix 1. Reconnect Tidal to Last.fm
If your Last.fm not is scrobbling Tidal stats as usual, simply disconnect it from your Tidal account, and reconnect to help. This step can refresh the API connection.
Fix 2. Update the Tidal App
We all know that Tidal has integrated with Last.fm to track your music. You’ll make sure your Tidal app is the latest version to support Last.fm connect within its app. Otherwise, you should update the Tidal app at once.
Fix 3. Clear Tidal Cache
Corrupted cache files can prevent Last.fm from scrobbling your listening stats. Thus, it’s always a good idea to clear the cache data of the Tidal app. If you are using an Android device, you can do so by selecting Settings > Apps > Tidal > Storage > Clear Cache. For iPhone users, offloading the Tidal app is fine.
Fix 4. Disable Battery Optimization [Android]
When you enable the Battery Optimization feature on your Android phone, your phone can prevent background scrobbling. Thus, go to the Settings app on your Android device and make sure you haven’t enabled this feature. Plus, allow both the Tidal and Last.fm apps to run in the background without limits.
Fix 5. Use other Last.fm Tidal Scrobblers
If the built-in Tidal Last.fm integration keeps failing, you can try alternative scrobbling tools like Web Scrobblers on your browser. This is especially helpful for users who prefer streaming Tidal on its web player.
Part 3. Ultimate Fix to Last.fm Not Working: Download Tidal Locally
If you find that Last.fm is still not working after trying all the solutions above, the ultimate fix is to download Tidal songs for offline playback. Since Last.fm can not only track the listening stats from those music streaming services but also have access to the audio files playing on your PCs, tablets, and other devices, you can download Tidal songs first, and then listen to them offline on supported players like iTunes and WMP for scrobbling.
To get this done, you’ll need a specific tool: TunesMake Tidal Music Converter. Why? That is because all Tidal music files are DRM-protected, which means you can only play them on the Tidal app. This is because the DRM files are encoded with special formats, which prevent them from streaming on other unsupported devices. Luckily, the TunesMake program can break the limit!
With the advanced decryption technology of the TunesMake Tidal Music Converter, you can easily download and convert Tidal content to common audio files like MP3, M4A, M4B, WAV, FLAC, and AIFF while retaining the original sound quality. What’s more, the TunesMake tool supports batch download and audio personalization. Once downloaded, you can easily play Tidal music whenever and wherever you want. Can’t wait to see how it works? Here is the tutorial:

TunesMake Tidal Music Converter –
Convert & Transfer Tidal Music to Last.fm
- Download any Tidal content, including songs, albums, playlists, and artists
- Convert Tidal music to MP3, FLAC, AIFF, WAV, M4A, and M4B
- Preserve a whole set of ID3 tag information in the downloaded Tidal songs
- Handle the conversion of Tidal music up to 22X faster speed and in batch
Security Verified. 100% Clean & Safe.
Step 1
Import Tidal Tracks to Download
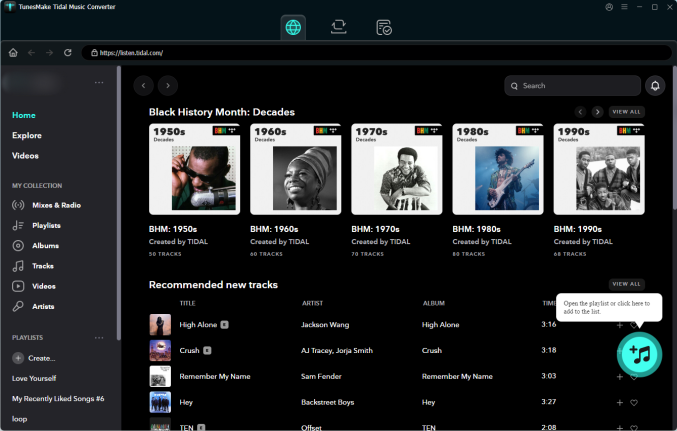
TunesMake Tidal Music Converter is now available on both Windows and Mac computers. You can choose the version that is compatible with your operating system and install it on your desktop by clicking the Free Download button above. When you launch the tool, you will see the Tidal web player load simultaneously. Find the playlist you want to download, and then click the lower Add icon > Add to List. So, all the songs in this playlist will be loaded to the conversion list.
Step 2
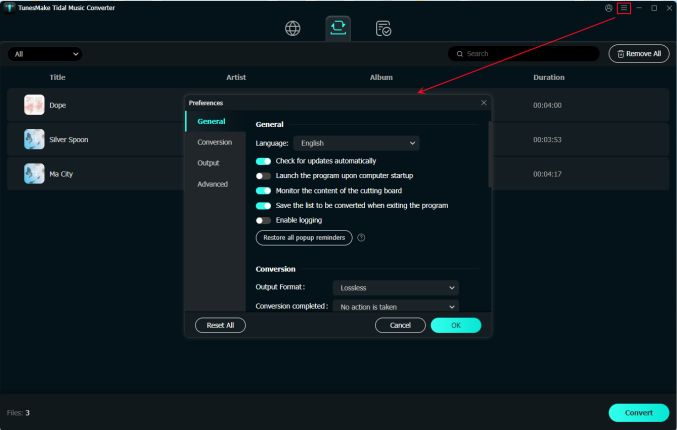
Select Preferred Output Audio Formats
Once the songs you need are loaded, you can select the output format and parameters in the three-line icon on the top right of the main screen. In the pop-up menu, choose Preferences > Conversion to set sample rate, bit rate, channel, and archive according to your needs. The conversion will be done at 22x speed as default.
Step 3
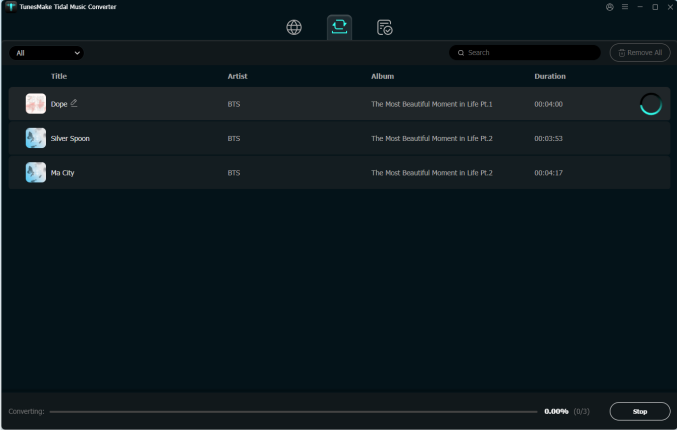
Download Tidal Songs Offline
After setting the formats, you can click the Convert button to start the conversion. It’s no problem to convert a batch of music files. Just have a cup of tea, and you’ll get the converted tracks soon. Once finished, you can access the converted music files easily in your local folder by clicking the Converted icon.
Part 4. Summary
Thanks to Last.fm Tidal integration, we are now able to access and use Tidal with Last.fm with simple steps. We have shared the guide on how to connect Tidal to Last.fm above. Moreover, to solve Last.fm Tidal not working issue forever, you can download Tidal music offline forever via TunesMake Tidal Music Converter. Last.fm will also track the music you play on your Windows computer.
Related Articles
A senior editor from TunesMake, dedicated to sharing professional tutorials and solutions of software, movies, and music.
- 1
- 2
- 3
- 4
- 5
- 6
- 7