
Apple Music is an excellent music streaming platform where users can stream over 100 million songs and 30,000 playlists online and offline. However, many users have local files, including sound recordings, purchased music, demos, and original audio files on their devices that they want to add to the Apple Music library for easy access. Switching from one media player to another is knotty, so you can try to add them to the Apple Music app on your device and listen to them alongside your streaming music. This guide walks you through everything you need to know about how to add local files to Apple Music. Let’s check out now.

Part 1. Can You Add Local Files to Apple Music?
The question that users care about most is whether they can upload local files to Apple Music. Well, the answer is yes. Like Spotify and other streaming music services, Apple Music provides the function to add your local music files. You can do so easily via your Windows or Mac computer. All the necessary steps are listed in Part 2, and you can follow them to reach it.
What Types of Local Files Can I Add to Apple Music?
Although Apple Music supports uploading local music files, not all files can be added successfully. You should pay attention to the audio format of your local files. Currently, audio formats like MP3, AAC, M4A, WAV, and AIFF are compatible with Apple Music. If you have files in other formats, you might need to convert them before uploading.
Can I Add Local Files Directly from My Android to Apple Music?
Unfortunately, this is impossible. The Apple Music for Android app doesn’t support directly uploading music. The uploading process must be initiated from a computer using the Apple Music app or the iTunes app. Once added there and the Sync Library feature is enabled, your local files will appear on your other Apple products. If you want to enjoy both Apple Music songs and your local music files on your Android phone, jump to Part 5 to get the best workaround.
Do I Need an Apple Music Subscription to Add Local Files?
Adding local files to Apple Music doesn’t require you to have an Apple Music subscription. However, if you need to utilize the Sync Library feature and sync your local files across all your Apple devices, a valid Apple Music subscription is needed.
Will I Lose My Added Local Files If I Cancel My Apple Music Subscription?
If you cancel your Apple Music subscription, the local files stored on your computer will remain the same. They just can’t sync across your devices via Apple Music anymore. Any matched or uploaded songs that were only accessible through Apple Music's cloud library will become unavailable on other devices.
Part 2. How to Add Local Files to Apple Music on Windows/Mac
You can enjoy your audio files together with Apple Music on multiple devices. Here is a guide on how to upload local files to Apple Music on a computer. You can follow the instructions below to add your audio files whether you are using a Windows PC or a Mac. The only thing you should consider is a subscription to Apple Music. Let’s get started.
Upload Local Files to Apple Music on Windows
Step 1. Launch iTunes on your computer if you have iTunes installed.
Step 2. Click File at the top menu of iTunes, then select Add File to Library or Add Folder to Library.
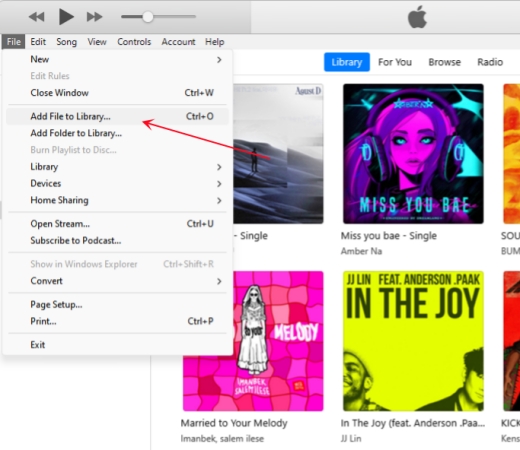
Step 3. In the pop-up window, navigate to the folder where you store your local files.
Step 4. Simply select the audio files you want to add and click the Open button to upload.
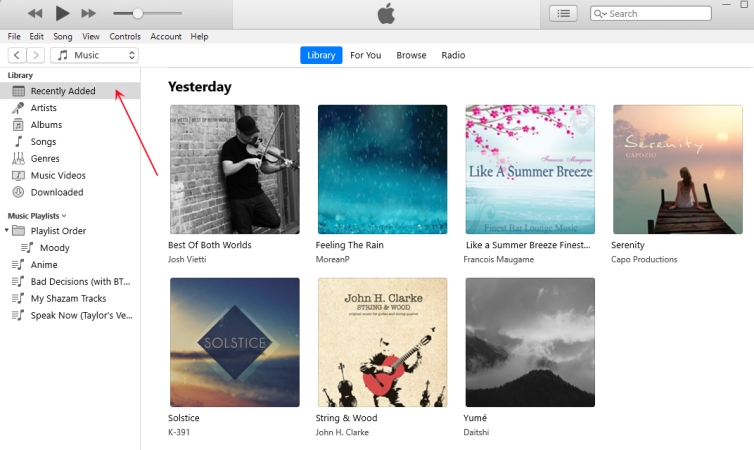
Step 5. After uploading your local files, go to click the Recently Added button.
Upload Local Files to Apple Music on Mac
Step 1. Open the Music app on your Mac computer.
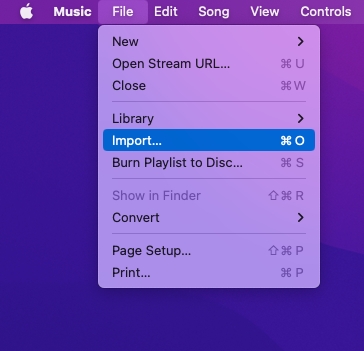
Step 2. Click the File > Import, then there will pop up a window.
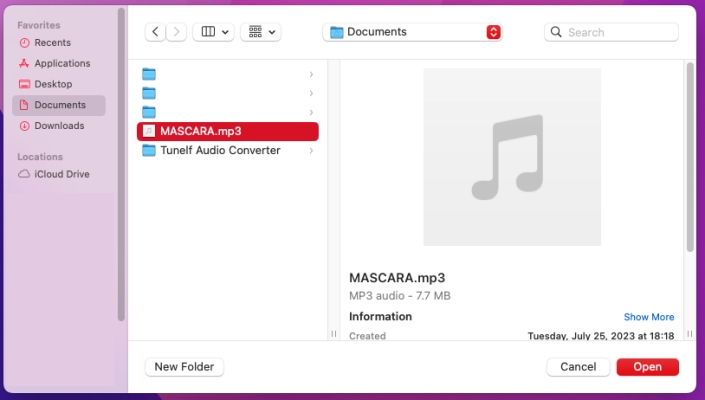
Step 3. Head to the folder where you store your own songs and select any music file.
Step 4. Click the Open button to upload your selected music files to Apple Music.
Step 5. Go back to Apple Music and click the Recently Added button.
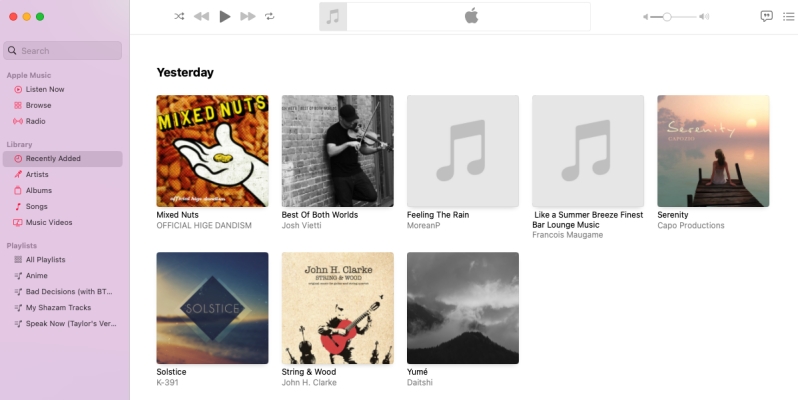
Now you can freely play your own music in Apple Music. Also, you can create a playlist to save your own songs. In addition to playing your own music, you can change the song information, including the artwork, album, genre, and so on.
Part 3. How to Sync Local Files to Apple Music on iPhone/iPad/Apple Watch
As Apple Music doesn’t support directly uploading local music files from your mobile devices, you have to add your own songs to Apple Music on a computer first. Once done, you can sync them to your other Apple devices. Here’s how to do it:
Sync Added Local Files to Apple Music iPhone/iPad
For Mac Users:
Step 1. Connect your iPhone or iPad to your Mac computer using a USB cable.
Step 2. Then open Finder on your Mac and select your device in the sidebar.
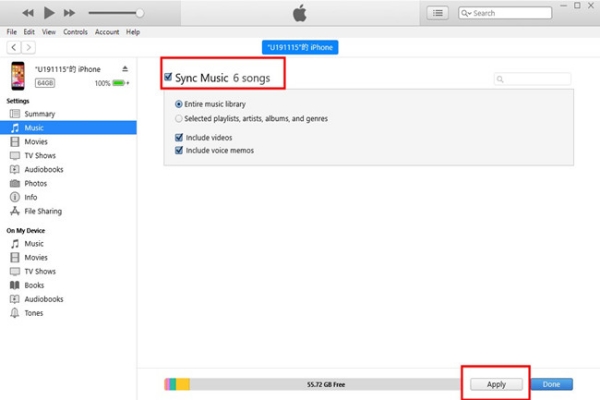
Step 3. Choose Music in the button bar. Then, it will pop up a new window, where you should choose Sync music onto [Your device name].
Step 4. After that, you can select the checkbox for the item Entire music library or Selected artists, albums, genres, and playlists depending on your needs.
Step 5. Once finished, you can click Apply. Then, you can find your local files on the Apple Music app on your iPhone or iPad.
For Windows Users:
Step 1. Make a connection between your iOS device and your Windows computer via a compatible USB cable.
Step 2. Launch the iTunes app on your desktop and choose your device at the left bar.
Step 3. After that, You should select Music > Sync Music > Entire music library/ Selected playlists, artists, albums, and genres.
Step 4. Next, click Apply. Go back to the Apple Music app on your iOS device and you can enjoy your local files.
Sync Added Local Files to Apple Music for Apple Watch
Step 1. Launch the Watch app on your iPhone, then tap My Watch > Music.
Step 2. Below Playlists & Albums, tap Add Music.
Step 3. Select your local music files to sync to your Apple Watch.
Part 4. Troubleshoot: Apple Music Local Files Not Syncing
Syncing your local files to Apple Music is not a difficult process. But it did not work every time. You may find the sync failed or your local songs missing after syncing. When you are facing such issues, don’t panic. Here are some useful solutions for you to fix this issue.
1. Verify your Internet connection. A poor connection might cause sync issues. Make sure that all your devices are connected to a stable Internet during the sync process.
2. Check iCloud Music Library settings. Make sure that the Sync Library feature is turned on for all your devices. For computer users, you can go to the Apple Music app and choose Settings > General > Sync Library to enable it. If you want to turn on this feature on your iPhone, you will need to go to the Settings app on your device. Then, select Music > Sync Library.
3. Check your Apple ID. Check the Apple ID you logged in on all your devices. You should sign in with the same Apple ID on both your mobile device and your computer.
4. Wait for a while. Sometimes the songs don’t show up on your other device because it’s waiting to sync. You should wait patiently until the sync process is finished completely.
5. Restart your devices. Delete the local files on your music library and restart the iTunes/Music app on your computer. Then, you can add the local files and try to sync them again.
6. Update your software. Make sure that you are using the latest version of iTunes or the Apple Music app on both your mobile device and your computer. Older versions might not support all syncing features.
Part 5. Bonus: How to Download Apple Music Songs as Local Files
By following the above steps, you can easily add your local music files to Apple Music on your computer and sync them to other Apple products. However, if you are using an Android device, the sync feature doesn’t work. It can be frustrating for users who want to enjoy Apple Music songs and local music files together. No worries. We have found an alternative method to help you reach your goal. That is to download your preferred Apple Music songs as local music files. Once done, you can add the downloaded Apple Music songs and your local files to a media player on your Android phone for unlimited access.
Since all Apple Music songs are encoded with AAC protection format, you can only keep your downloaded songs for playing within the Apple Music app. Once your subscription ends, all the downloaded songs will be greyed out. Therefore, you must use a third-party Apple Music downloader to save your favorite songs instead of the official downloading method. It is possible to download Apple Music songs locally and keep them forever as long as you use the TunesMake Streaming Audio Recorder.
TunesMake Streaming Audio Recorder is a professional audio converter that has gained popularity in recent years. It can deal with three special kinds of audio files, including Apple Music audio, iTunes audio, and audiobooks. With the help of TunesMake software, you can remove DRM from Apple Music easily and convert Apple Music into six popular audio formats like MP3. After conversion, you can play Apple Music songs on any device or through any media player. In this way, you can directly use the preinstalled media player on your device to play Apple Music.

Streaming Audio Recorder –
Download Streaming Music to MP3 on PC and Mac
- Unlimitedly download streaming music songs, playlists, and podcasts
- Losslessly convert streaming music to MP3, M4A, M4B, WAV, FLAC, and AIFF
- Remove DRM protection from many streaming music platforms
- Convert streaming songs with original sound quality and ID3 tags kept
Security Verified. 100% Clean & Safe.
Step 1
Select Apple Music Songs to Download
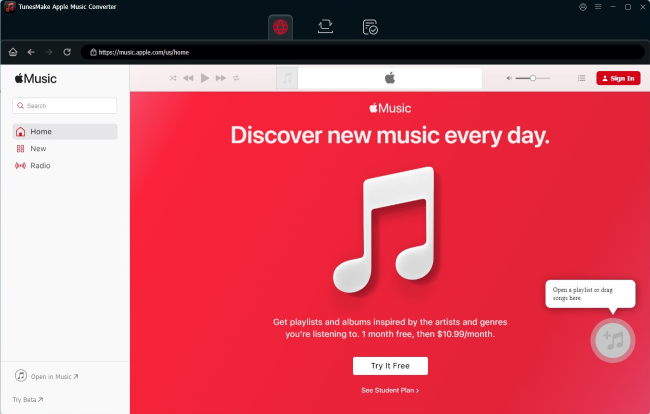
Click the Free Download button above and you can get the Windows or Mac version of TunesMake Streaming Audio Recorder installed on your computer. Then, launch it and the Apple Music web player will be loaded automatically in its interface. Now, you need to find any song you like and add it to TunesMake’s conversion list by dragging and dropping it to the bottom Add icon. You can also select any playlist or album, and click the Add icon > Add to List to load multiple songs at once.
Step 2
Customize the Output Audio Settings
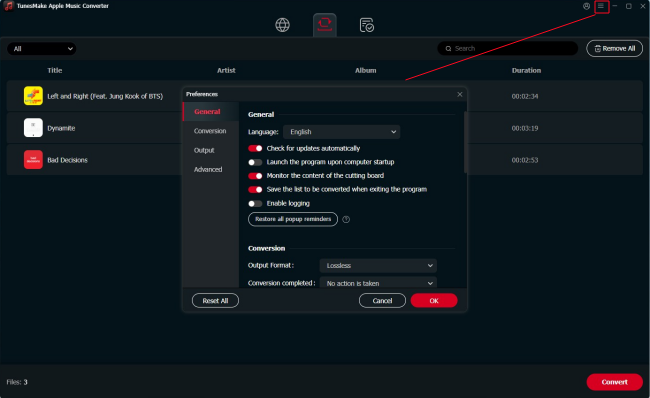
Depending on your personal demands, you can set the output format you need. Click the Menu icon at the top. Then, select Preferences > Convert. In this new window, pick any audio format you like. You can change other audio parameters as well. For example, bit rate, channel, and sample rate. When you finish, click the OK button to save all your changes.
Step 3
Go to Download Apple Music to MP3
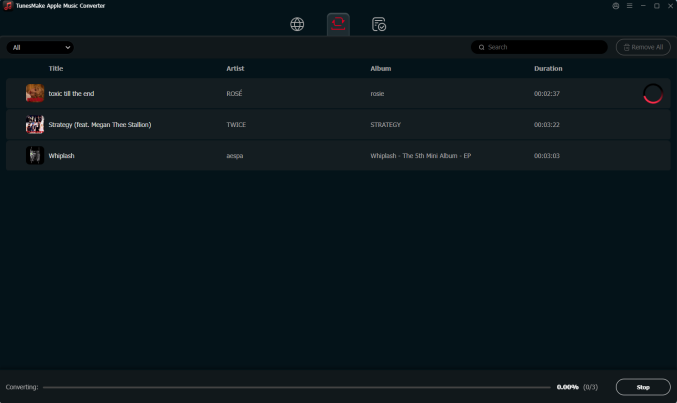
To initiate the conversion of Apple Music, you only need to click the Convert button. Then TunesMake Streaming Audio Recorder will start downloading and converting your selected Apple Music songs. All the converted Apple Music songs will be saved to the default converted folder on your computer. You can click the Converted button and use the file icon next to the song to locate the folder.
Step 4
Enjoy Apple Music songs and local files on Android devices
Now you have already saved your Apple Music songs locally. You can transfer the Apple Music songs to Poweramp or other media players. This makes it incredibly simple to play your Apple Music songs and any other local files all together in one player.
Part 6. Conclusion
Adding local files to Apple Music is a great way to centralize all your music in one place. Whether you’re using a Mac or Windows PC, the process is simple and ensures your personal music collection integrates seamlessly with your Apple Music library. However, for Android users, a better choice is to download Apple Music songs as local files. Using tools like TunesMake Streaming Audio Recorder lets you easily convert and save your music for offline enjoyment, without the limitations of streaming.
Related Articles


A professional writer at TunesMake, crafts in-depth tutorials, practical tips and expert advice focusing on streaming music, technology, and more.
- 1
- 2
- 3
- 4
- 5
- 6
- 7