
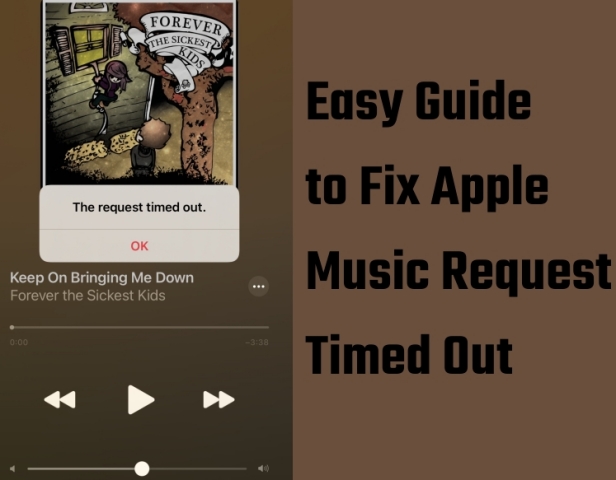
Apple Music seems to be having an issue with iOS 15/15.0.1. While on a cellular connection, about 80% of the songs I try to play time out. I’m getting a very strong cell connection with great throughput, so it’s not that. It seems to work normally while on WiFi. I’ve tried restarting, restoring to the factory, and a new phone (iPhone 12 to iPhone 13), but get the same issue. I’m pretty tech-savvy, but I can’t figure this out. Help! Why there is an error occurring while I am downloading the iOS 15.5 ?”
— From community.apple.comThis is a user’s review from the Apple Community. It shows that the Apple Music timed out error is plaguing some users and is challenging to be solved. So why does Apple Music say the request timed out and how to fix the issue? Perhaps you will get the answer in this post.
Part 1. Why Does Apple Music Say Request Timed Out?
Firstly, a request timed out means the inability of client software to receive an answer. The request timed out error message on Apple Music usually happens when you are using cellular data rather than WiFi.
In addition to this, the request timed out in Apple Music means your Apple Music’s or mobile’s general settings went wrong. Maybe you will check these settings to fix the issue of the request timed out in Apple Music.
In a word, the request timed out in Apple Music has a strong possibility because of the bad quality of the network. Or some unwitting settings on the mobile phone and app have been carried out by people, causing Apple Music to request timed out. So in the next two parts, the article will give some tips to fix the timed out issues in Apple Music from two aspects.
Part 2. General Solutions to Fix Apple Music Timed Out
As we mentioned earlier, many users use Apple Music with cellular on their devices. So you can try to check your device’s settings. Here are the steps for iPhone and iPad users.
Method 1. Check Cellular Data Permissions
This method is in favor of fixing the problem of cellular data. The following is how to check Apple Music’s Cellular Data configuration.
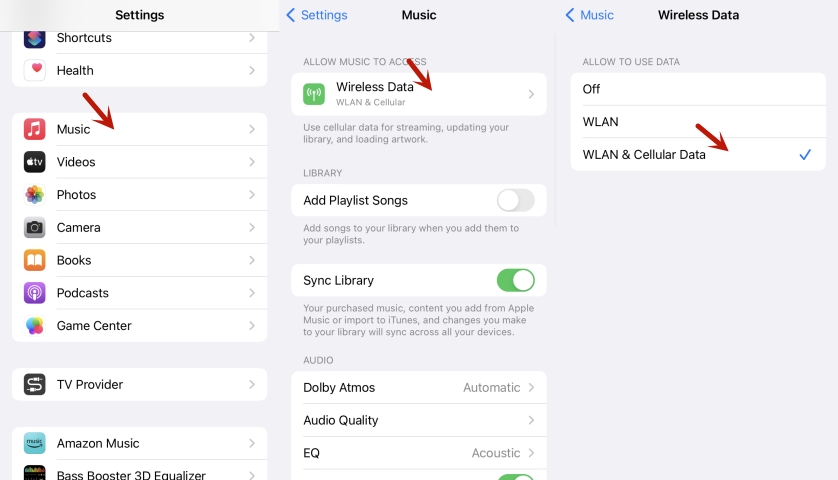
1) Head to your device’s Settings menu and find Music.
2) Tap Wireless Data.
3) Check whether the Cellular Data option is enabled or not.
4) Check the WLAN & Cellular Data button to ensure it is on.
Method 2. Reset the Network Settings
In this case, your device’s network is equivalent to a refresh and reset. This operation makes your device’s network quality smoothly.
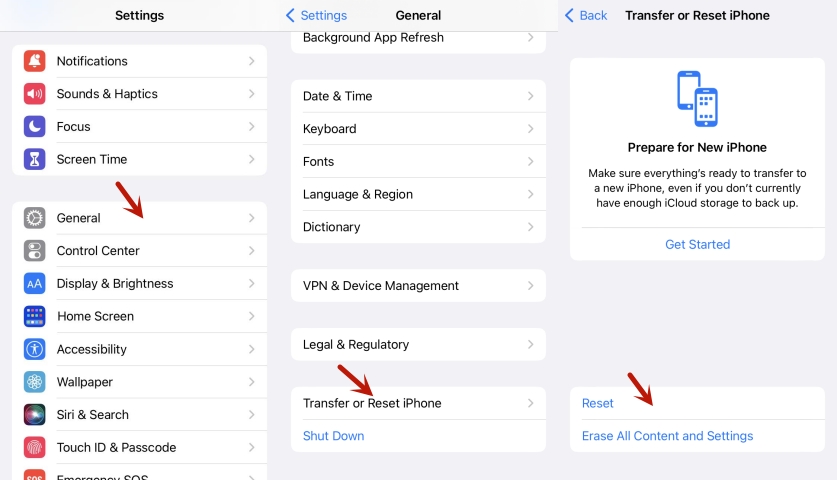
1) Tap your device’s Settings menu and find General.
2) Choose Transfer or Reset and tap on Reset.
3) Select Reset Network Settings and confirm your choice.
4) Reboot your device.
Method 3. Turn Flight Mode On and Off
This method aims to turn off all incoming and outgoing connections from your device and reconnect. Such an operation is equivalent to a network reconnection update effect. You can follow the following steps to turn on and off Flight mode on an iPhone:
1) Tap the Settings menu.
2) Find the Airplane Mode option and slide the toggle switch beside it to turn it on.
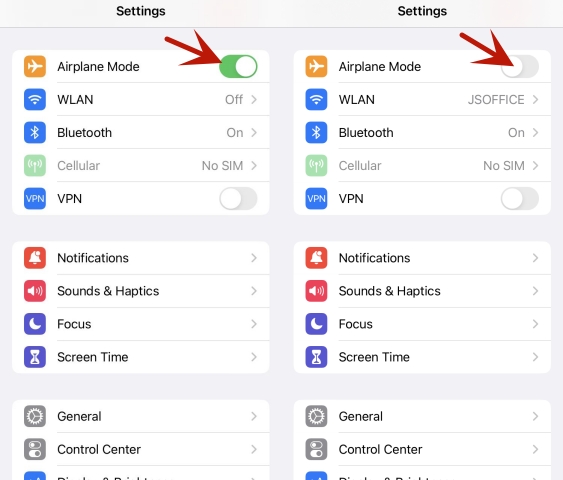
3) Wait for several minutes.
4) Switch back the toggle button to turn off Airplane Mode.
You can also do the above operation briefly via the Control Center.
Method 4. Turn Off the Background App Refresh
Background app refresh allows an app to continually refresh even if the app is not in use. However, the persistence of this feature may affect the stability of the device’s network. You can try turning off Apple Music’s background app refresh. The following method may help reduce the occurrence of Apple Music timed out.
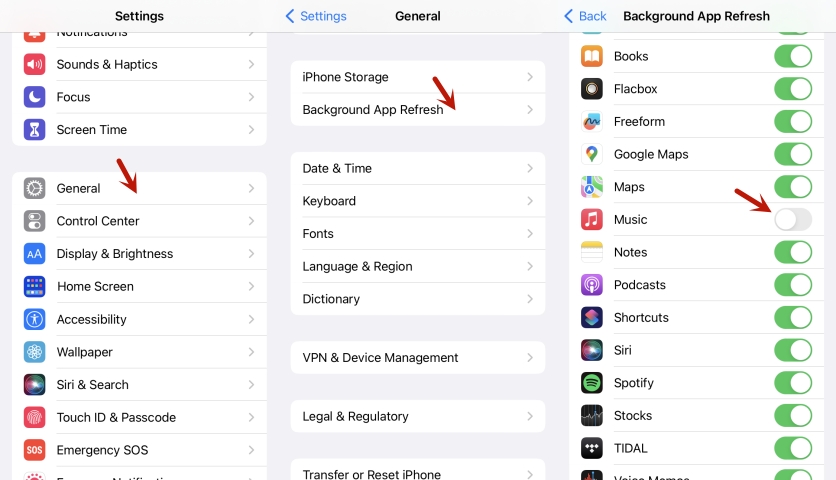
1) Head to your device’s Settings and then find General.
2) Select Background App Refresh.
3) Find Apple Music and toggle off the option to prevent it from refreshing in the background.
Method 5. Remove Content Restriction
After completing the following steps, Apple Music content restrictions on your device may be removed. Therefore, this operation may solve the request timed out Apple Music issue.
1) Tap the Settings and find the Screen Time.
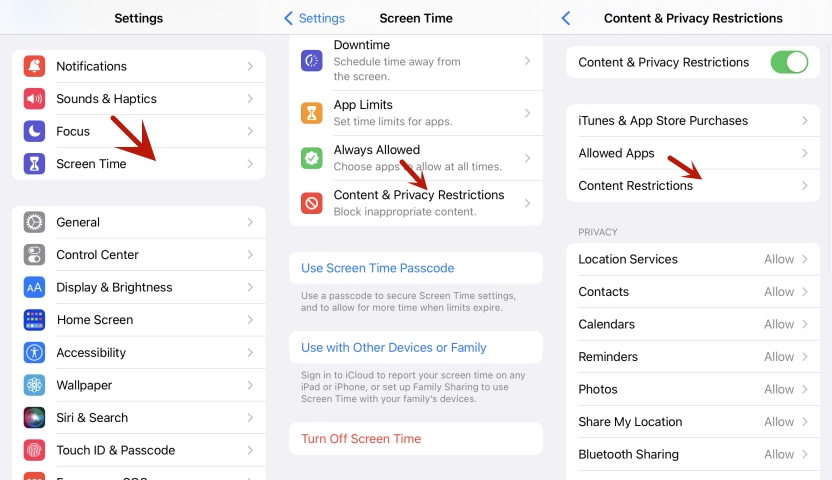
2) Tap Content &Privacy Restrictions.
3) Turn on Content & Privacy Restriction and choose Content Restriction.
4) Tap Music, Podcasts, Fitness.
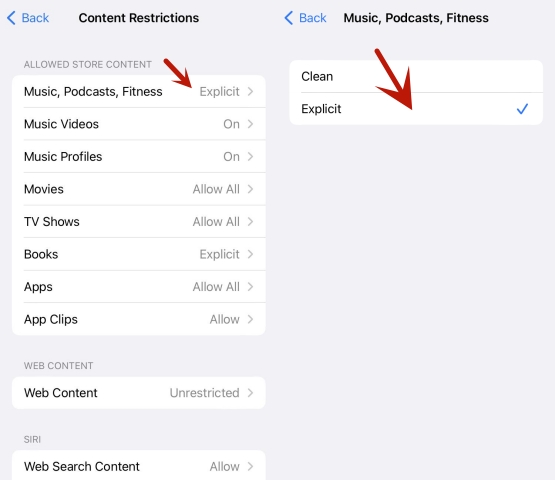
5) Tap Clean to only allow clean music or tap Explicit to allow all music.
Method 6. Sign out of your iCloud Account.
You can try logging out of your iCloud account to sign out of all Apple services and then log back into your account. This operation may solve the Apple Music request timed out if it is due to an account-app malfunction.
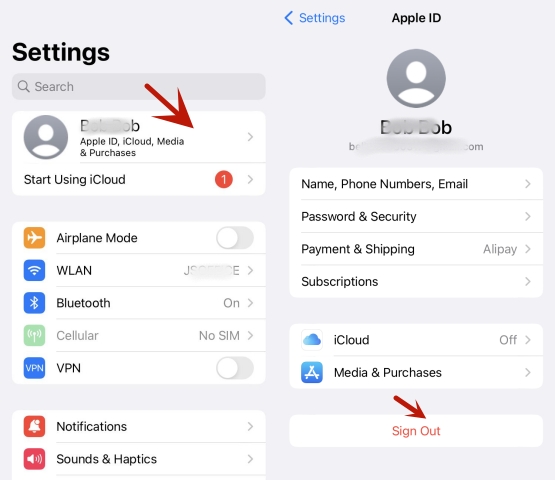
1) Tap Settings on your device and find your name.
2) Scroll down and choose Sign Out.
3) Type in your Apple ID password and choose Turn Off.
4) Tap on Sign Out and confirm.
Part 3. Advanced Settings to Fix Apple Music Timed Out
If you checked that it is not your mobile’s settings wrong, you’ll check the issues from your Apple Music app.
Method 1. Reboot Apple Music
Close the Apple Music app completely and reboot it. Try again to see if you received the request timed out Apple Music again.
Method 2. Check Your Apple Music Subscription
Ensure your Apple Music subscription is within the validity period.
1) Tap Settings and scroll down to choose iTunes &App Store.
2) Tap your Apple ID and select View Apple ID.
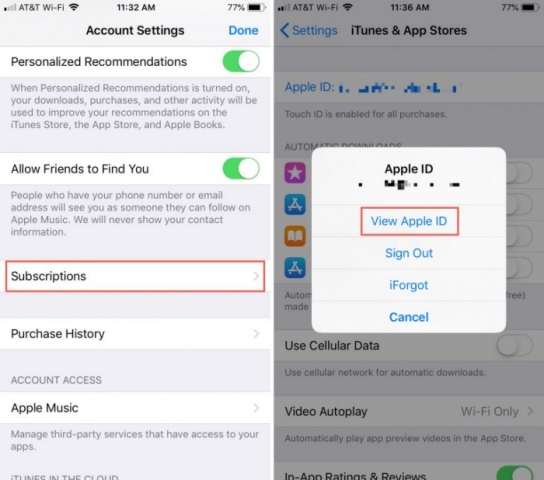
3) Tap Subscriptions and choose Apple Music Membership.
4) Check your membership deadline.
Method 3. Update Apple Music to the Latest Version
Check your Apple Music version. Verify you have the latest version of the Apple Music app installed on your mobile device. By the way, you can also update your device to the latest version.
1) Head to the Apple Store.
2) Search for Apple Music then update the app.
Method 4. Delete the Cache of the Apple Music app
The only way to clear the cache in the Apple Music app on your iPhone would be to reinstall the app. After clearing the cache, your Apple Music app may run more smoothly.
1) Tap and hold on to the Apple Music app.
2) Tap on Remove app and Delete app to uninstall the app.
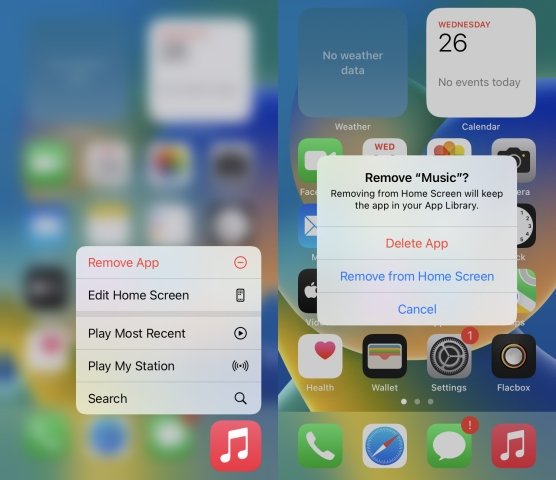
3) Redownload the Apple Music app.
Part 4. Ultimate Fix: Download Apple Music Locally for Backup
If you encounter a request timed out in Apple Music, believe one of the above solutions will help you solve it. But there are also many users who get the error message that says the request timed out in Apple Music frequently.
The best way to avoid Apple Music timed out is to download Apple Music songs forever by using TunesMake Streaming Audio Recorder. With that converter, you can listen to music offline and ignore the impact of the network. In addition to this, you can play downloaded music on many other devices that support this file format. This makes it possible to listen to music anywhere and anytime without using Apple Music, thus avoiding the issue of the request timed out.
To download Apple Music forever, TunesMake Streaming Audio Recorder can be the best choice for you. TunesMake Streaming Audio Recorder has the function of removing DRM from Apple Music and converting Apple Music to MP3. The following content will tell you how convenient to download and convert Apple Music using TunesMake Streaming Audio Recorder.

Streaming Audio Recorder –
Download Streaming Music to MP3 on PC and Mac
- Unlimitedly download streaming music songs, playlists, and podcasts
- Losslessly convert streaming music to MP3, M4A, M4B, WAV, FLAC, and AIFF
- Remove DRM protection from many streaming music platforms
- Convert streaming songs with original sound quality and ID3 tags kept
Security Verified. 100% Clean & Safe.
Step 1
Add Apple Music Songs to the Converter
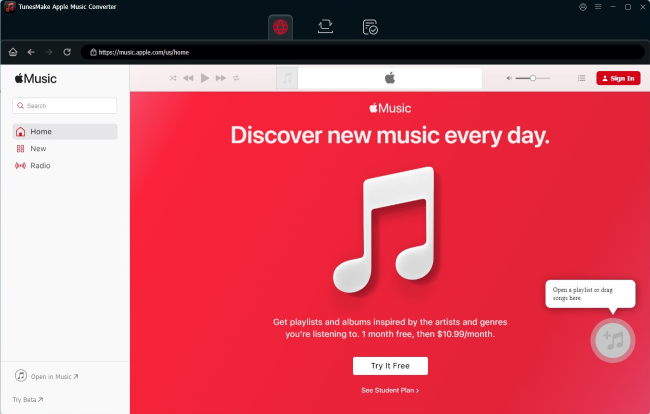
When you install the TunesMake Streaming Audio Recorder on your device and click open, the Apple Music web player opens in its interface at the same time. Then, you can select the playlist you want to download. Click the Add icon > Add to List to load the songs you want to download from Apple Music to the conversion list.
Step 2
Confirm the Output Format and Parameters
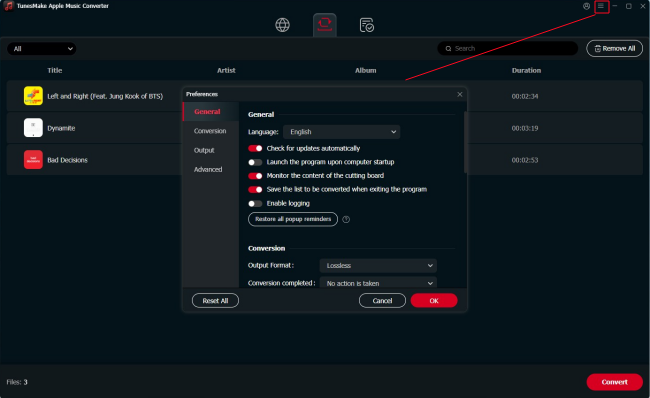
Now, click the top Menu icon > Preferences. When it pops up a new window, you can personalize the output settings. First, you should choose an output format according to your needs. Then, you can decide on other parameters, including codec, channel, sample rate, and bit rate. When you are done, click the OK button and start the next step.
Step 3
Convert Apple Music to MP3 Files Forever
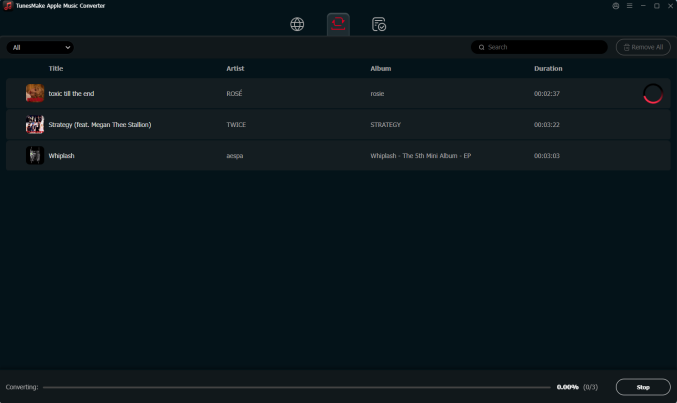
After you complete all these settings, just click the Convert button and wait a second. TunesMake Streaming Audio Recorder will automatically convert Apple Music to MP3 and store the files on your device. In addition to this, the converted files can also be played on other devices. To find their location on your computer, just click the top Converted icon.
Conclusion
In a word, although there are many ways to solve the request timed out issue, we can know that downloading Apple Music to files may be the best way to avoid problems and get a better experience. When you convert the Apple Music you like to MP3 or other files, you’ll never be plagued by the request timed out Apple Music issue. So, why not try TunesMake Streaming Audio Recorder?
Related Articles


A professional writer at TunesMake, crafts in-depth tutorials, practical tips and expert advice focusing on streaming music, technology, and more.
- 1
- 2
- 3
- 4
- 5
- 6
- 7