
With a vast library of high-quality, crystal-clear music in Apple Music, finding and enjoying your favorites has never been easier. However, all media on Apple Music, such as music, audio, and video, are protected by Digital Rights Management (DRM), even if you download them with your subscription. When you lose your subscription, your music library, which you spent time building up, will disappear. Thus, many users choose to record Apple Music with the right screen and audio recorder features or programs. If you are figuring out how to screen record Apple Music and how to save your favorite tunes offline permanently, you should keep an eye on this post. In this comprehensive guide, you can find three easy yet effective methods to record Apple Music like a pro. Let’s get started.
Method 1. Screen Record Apple Music Directly on iPhone/iPad/Mac
Screen Recording is a built-in feature on Apple devices that allows you to capture video of what’s happening on your screen, including audio. This feature is available on iPhones, iPads, and Macs running the latest versions of iOS, iPadOS, and macOS. Just make sure the audio from Apple Music and Screen Recording is accessible and set up on an Apple device above, and you’re officially ready to record Apple Music songs with this feature.
For iPhone, iPad:
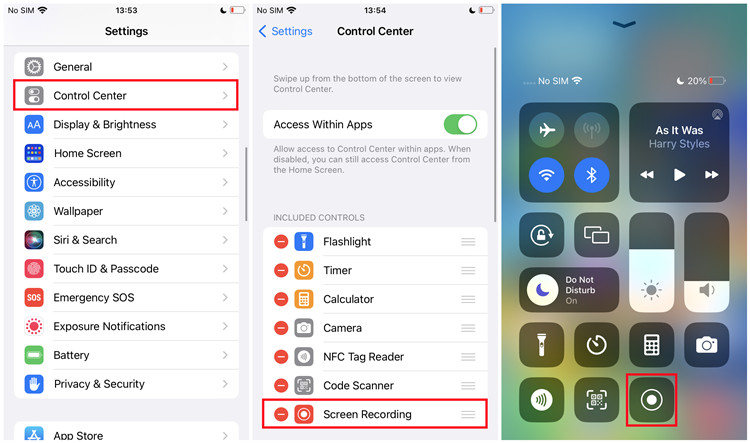
Step 1. From the home screen, open the Settings app.
Step 2. Scroll down and tap Control Center.
Step 3. Scroll down to Screen Recording. If it’s not included, scroll down to More Controls where it will appear.
Step 4. Tap the Add button next to Screen Recording to enable this feature.
Step 5. Now back to the home screen and open the Control Center. For iPhone X or later or iPad with iPadOS 13 or later, swipe down from the upper-right corner of the screen. For iPhone 8 or earlier on iOS 11 or earlier, swipe up from the bottom edge of the screen.
Step 6. In the Control Center, tap on the Record button.
Step 7. Launch the Music app and go to what you want to record and play it.
Step 8. To stop the recording, tap the red bar on the top of the screen and tap on the Record button. Alternatively, you can return to the Control Center to stop the recording.
Thus, Apple Music is screen recorded successfully, and your screen recording is now stored in the camera roll.
For Mac:
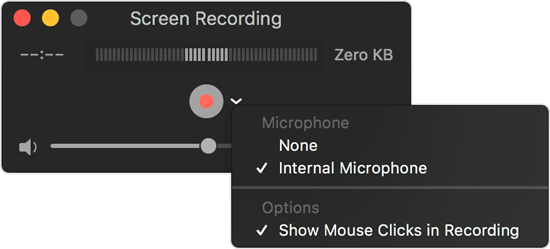
Step 1. Open QuickTime Player from your Applications folder.
Step 2. Choose File > New Screen Recording from the menu bar.
Step 3. Before starting your recording, you can click the arrow next to the Record button to change the recording settings. To record your voice or the Apple Music audio with the screen recording, choose a microphone.
Step 4. To start recording, click the Record button. You can click anywhere on the screen to begin recording the entire screen, or drag to select an area to record, then Start Recording within that area.
Step 5. Launch the Music app and play what you want to record.
Step 6. To stop recording, click the Stop button in the menu bar. Alternatively, you can press Command-Control-Esc (Escape).
Step 7. After you stop recording, QuickTime Player automatically opens the recording. You can now play, edit, or share the recording.
Method 2. Record Apple Music Songs Without Sound Quality Loss
Screen Recording is a handy feature that can be useful for a variety of purposes, such as creating tutorials, sharing gameplay footage, or capturing important information on your device. However, you may not be happy with the audio quality of the recording from the Apple Music playback on your device. Or, you find that screen recording is time-consuming, especially when you need to record an entire playlist. In this case, a better choice is to use a professional record tool designed especially for streaming music - TunesMake Streaming Audio Recorder.
Best Apple Music Recorder – TunesMake Streaming Audio Recorder
TunesMake Streaming Audio Recorder is a versatile and powerful music downloader and recorder. It possesses decryption technology and can help you download songs, playlists, albums, and podcasts from different streaming music platforms in just one simple click. What’s better, it allows you to save your favorite content as local audio files in diverse formats, such as MP3, M4A, M4B, WAV, FLAC, and AIFF. During the downloading and converting process, the sound quality won’t be compressed. In other words, you can save your favorite Apple Music songs offline and listen to them anywhere effortlessly, even if your Apple Music subscription expires.

Streaming Audio Recorder –
Best Apple Music Recorder
- Unlimitedly download streaming music songs, playlists, and podcasts
- Losslessly convert streaming music to MP3, M4A, M4B, WAV, FLAC, and AIFF
- Remove DRM protection from many streaming music platforms
- Convert streaming songs with original sound quality and ID3 tags kept
Security Verified. 100% Clean & Safe.
Step 1
Add Apple Music to TunesMake
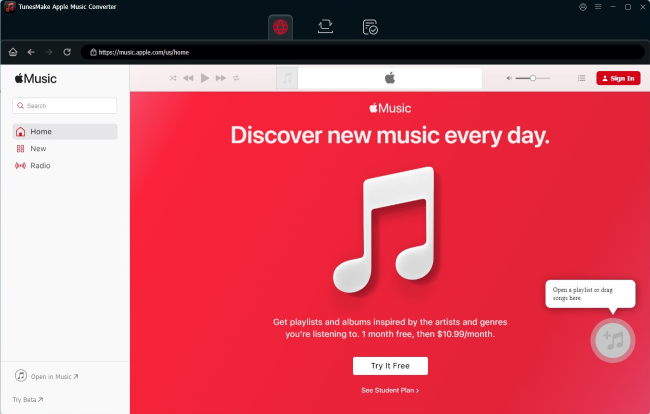
According to your computer’s operating system, you can choose the Windows or Mac version of the TunesMake Streaming Audio Recorder and install it via the Free Download button above. Once done, launch the TunesMake program and choose Apple Music. After that, you will be led to the official Apple Music web player. Simply sign in to find the playlist you want to download. To load the songs to TunesMake’s conversion list, you need to click the Add icon in the lower-right corner and select Add to List.
Step 2
Remove DRM from Apple Music
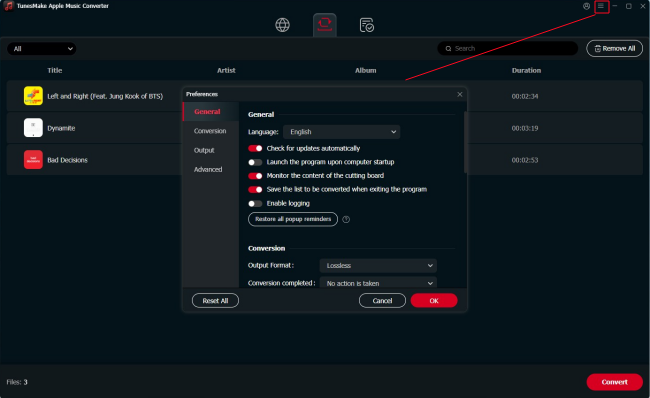
After loading all your favorite Apple Music songs, it’s time to personalize the audio settings as you wish. Click the top Menu icon, and then choose Preferences > Conversion. In the settings window, you need to choose an output format you need. For a better compatibility, you should choose MP3. If you want better audio quality, FLAC is a great option. You can change other parameters as well, including channel, bit rate, sample rate, and so on. Don’t forget to click OK to save your changes.
Step 3
Record Apple Music with TunesMake
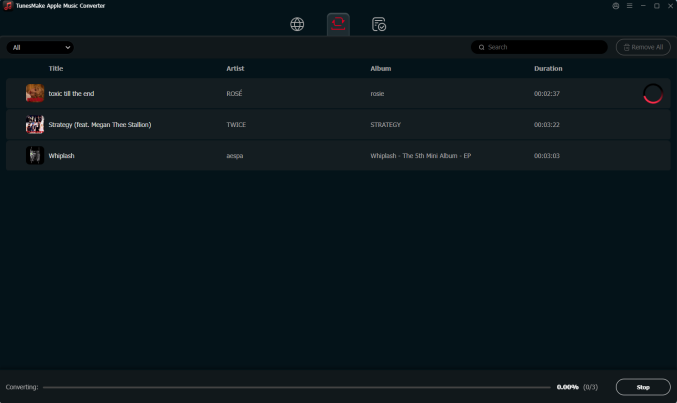
Now, everything is prepared. You can click the Convert button, and the TunesMake tool will begin downloading and converting the Apple Music songs you added automatically. Thanks to its fast conversion speed, you just need to wait for a while, and then you can find the downloaded songs by clicking the top Converted icon. Feel free to listen to them offline anywhere and anytime you want.
Method 3. Record and Download Apple Music Songs to MP3
Another popular audio recording and editing tool is Audacity. It is a free, open-source tool. The record feature in Audacity allows users to capture audio from various sources such as microphones, line-in inputs, and computer playback. Thus, you can install it on your desktop to record your Apple Music songs one by one and save the recordings in MP3 format. The only drawback is that the recording process is time-consuming.

Install and Set up Audacity on Desktop
Step 1. Visit the Audacity official website and install it on your desktop. Then, launch it.
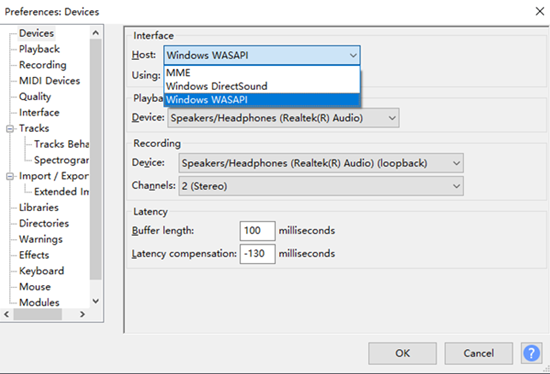
Step 2. Go to the toolbar > Edit > Preferences > Devices > Interface > Host, then select an option in the Audio Host box, such as MME, Windows DirectSound or Windows WASAPI (recommended).
Step 3. Go to the Devices > Payback > Recording, then choose the Device (the computer playback device you will be listening to), such as Speaker/Headphone. You’re recommended to choose the (loopback) input in the Recording Device box, then choose the lookback input for the recording device and playback device, ex: Speakers (loopback).
Record Apple Music with Audacity
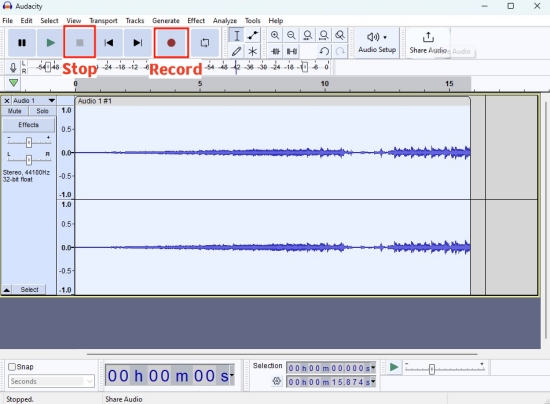
Step 1. To start recording, click the Record button at the top toolbar. Then start the audio playing from iTunes or Apple Music Web Player.
Step 2. While recording, you can monitor the input levels and adjust the input volume to ensure that the recording is not too loud or too quiet.
Step 3. To stop recording, click the Stop button. After you have recorded your audio, you can use the editing features in Audacity to clean up the recoding and remove any unwanted sections.
Export Recording from Audacity to MP3
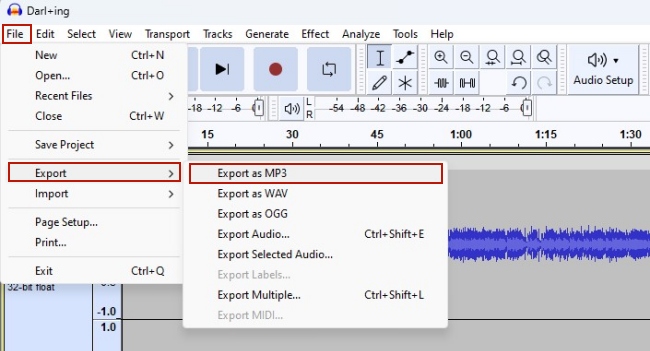
Step 1. To export the recording, go to the toolbar > File > Export.
Step 2. Here, you can choose an option. MP3 is recommended since it is compatible with most players. Just click Export as MP3.
Summary
Discover three efficient ways to record Apple Music on this page and select the most suitable solution to begin recording. Out of all the music recorders recommended, we highly suggest using TunesMake Streaming Audio Recorder as it can not only download audio in various formats but also provides lossless audio quality. Don’t miss the opportunity to try it out and experience its outstanding performance.
Related Articles


A senior editor from TunesMake, dedicated to sharing professional tutorials and solutions of software, movies, and music.
- 1
- 2
- 3
- 4
- 5
- 6
- 7