







 Store
Store


Have you ever found the perfect track on Apple Music and immediately wanted to set it as your custom iPhone ringtone? You aren't alone. Having your favorite song play every time someone calls is one of the best ways to personalize your device.
However, if you have ever tried to do this directly on your iPhone, you likely ran into a frustrating roadblock. Even if you have downloaded songs for offline listening through an active Apple Music subscription, those tracks simply do not appear as options in your sound settings, and they show up grayed out in editing apps like GarageBand.
This guide will explain why you cannot directly use Apple Music songs as ringtone and provide a seamless, step-by-step solution to bypass these restrictions, so you can use Apple Music as a ringtone on your iPhone or Android phone in just a few minutes.
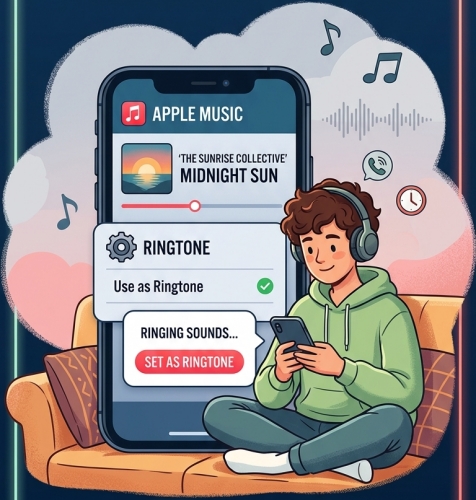
Part 1. Can You Use Apple Music for Ringtones?
Yes, you can use songs from Apple Music for your ringtones, but there is an important catch: you cannot directly use songs streamed or downloaded from an active Apple Music subscription because they are protected by Digital Rights Management.
-
DRM Protection: Apple Music is a streaming subscription service. The songs you download for offline playback are cached, protected audio files, not permanent ownership files.
-
Protection Error: If you try to load a downloaded Apple Music track into audio editors like GarageBand, you will be met with an error stating that protected songs cannot be imported.
-
30-Second Limit: Standard ringtones must be exactly 30 seconds or less. Even if an audio file is completely unprotected, iOS will reject it as a ringtone if it exceeds this strict time limit.
However, you can easily use songs you have legally purchased from the iTunes Store or set songs you have converted into a standard, unprotected audio format like MP3 or M4A with a third-party Apple Music converter as ringtones on an iPhone or Android phone. Here we will show you how to buy ringtones in the iTunes Store for your iPhone. If you prefer to make a song on Apple Music your ringtone, go on reading the next part.
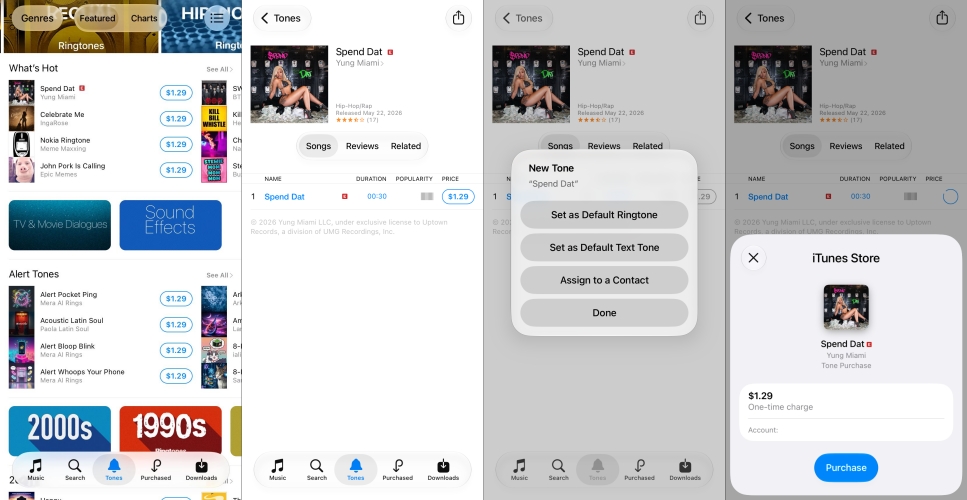
Step 1. Open the iTunes Store on your iPhone and tap Tones at the bottom.
Step 2. Browse or search for your favorite song in the iTunes Store.
Step 3. Select a song and tap the price at the rear of the song.
Step 4. Tap Set as Default Ringtone and complete the purchase.
Part 2. How to Make a Song from Apple Music Your Ringtone
As mentioned before, to make a song from Apple Music your ringtone, you need to remove restrictions from Apple Music and convert encrypted Apple Music songs to MP3 or M4A files. To bypass the restrictions, you will need a reliable third-party converter. TunesMake Apple Music Converter is highly recommended for this process. It allows you to download and convert Apple Music tracks, playlists, and albums into universal formats like MP3 or M4A while preserving the original lossless audio quality and metadata. Here is how to get your Apple Music song ready.

Streaming Audio Recorder –
Download Apple Music songs for using as ringtones
- Download songs, albums, and playlists from Apple Music
- Convert Apple Music to MP3, M4A, M4B, WAV, FLAC, and AIFF
- Remove DRM protection from Apple Music completely and safely
- Preserve the original audio quality and ID3 tags for management
- Support downloading music from 10 popular streaming platforms
Security Verified. 100% Clean & Safe.
Step 1 Select Apple Music You Need
Launch TunesMake Streaming Audio Recorder on your computer, and then select Apple Music from the main interface. Go to the built-in Apple Music web player and log into with your Apple Account details. Now you can find multiple songs or a playlist you want to use for ringtones. Simply click the + button to add them into the conversion list.
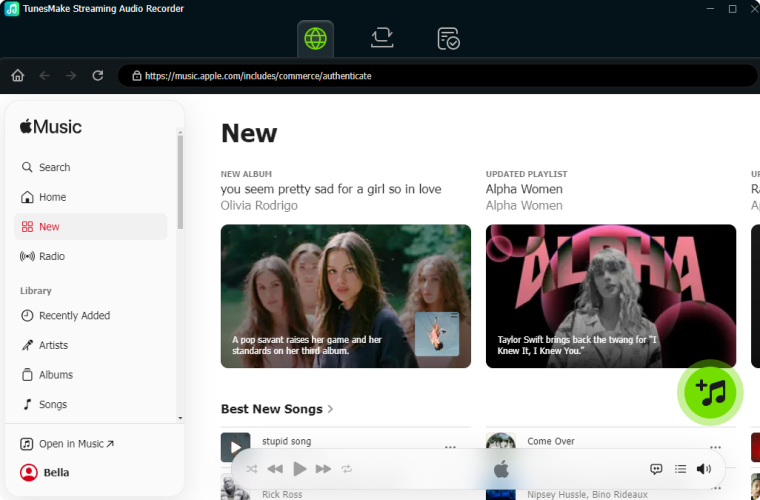
Step 2 Set MP3 as the Output Format
You may now change the output audio parameters to make your songs compatible with your device. Go to the Settings menu and click the Conversion button. As TunesMake provides six popular audio formats, you can select MP3 or M4A as the output audio format. Other audio parameters, such as bit rate, sample rate, and channel, can be customized.
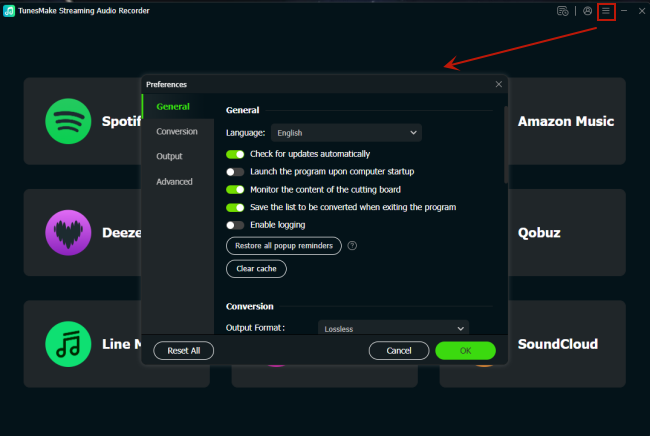
Step 3 Convert Apple Music for Ringtone
After you have complete the output audio parameters, you can click the Convert button to begin the conversion process of Apple Music to MP3 or M4A. You can find the converted music files when the procedure is finished. Click the History button when the conversion is done. Here you can find all the converted Apple Music files.
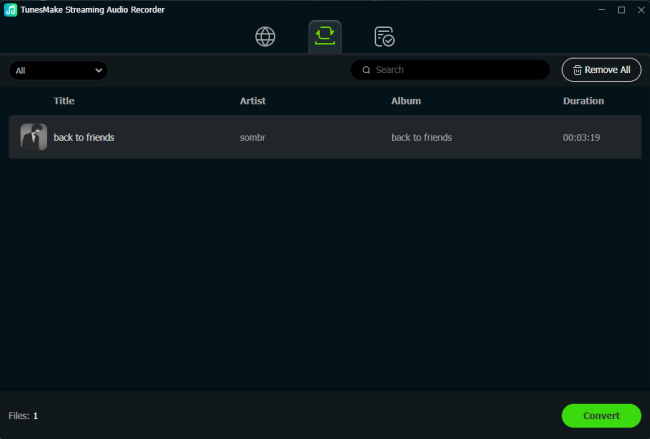
Part 3. How to Use Apple Music for Ringtone on iPhone
Once you have saved your converted Apple Music songs with TunesMake, you can set them as a ringtone easily on your iPhone. Here are two straightforward methods below to set it as your custom ringtone. Just select one according to your demand.
Method 1. One-Click Share Sheet Method (For Modern iOS Versions)
If your iPhone is running a modern iOS version such as iOS 27, Apple has introduced an incredibly simple shortcut that allows you to set any compatible audio file as a ringtone directly from the system's Share Sheet. But you need to use any free audio editor like Audacity to crop your converted file down to 30 seconds before transferring it.
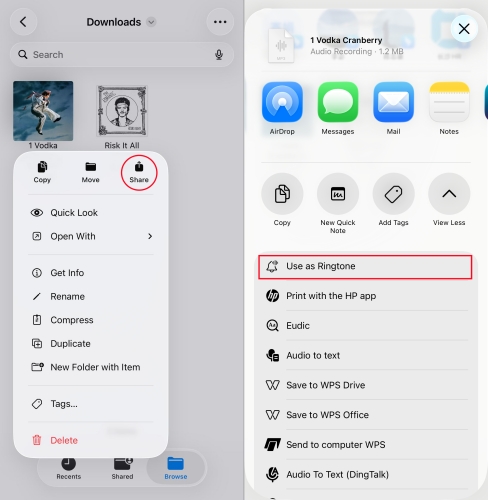
Step 1. Send the converted MP3 or M4A file trimmed to under 30 seconds to your iPhone.
Step 2. Open the Files app on your iPhone and find your saved song.
Step 3. Tap and hold the audio file, then select Share from the pop-up menu.
Step 4. Scroll down the sharing options and tap Use as Ringtone to save it to your ringtone library.
Method 2. Use the GarageBand App (For Trimming & Older iOS Versions)
If you are on an older iOS version, or if you need to manually trim your converted Apple Music song down to the exact 30-second sweet spot directly on your phone, Apple's free GarageBand app is the most reliable tool. You can transfer your converted song to your iPhone first, then use GarageBand to start trimming it.
Step 1. Install the free GarageBand app from the iOS App Store and open it.
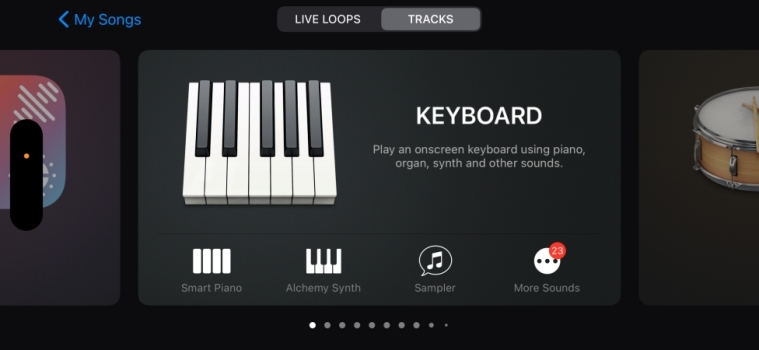
Step 2. Tap the Plus (+) icon, and choose Audio Recorder under the Tracks tab.
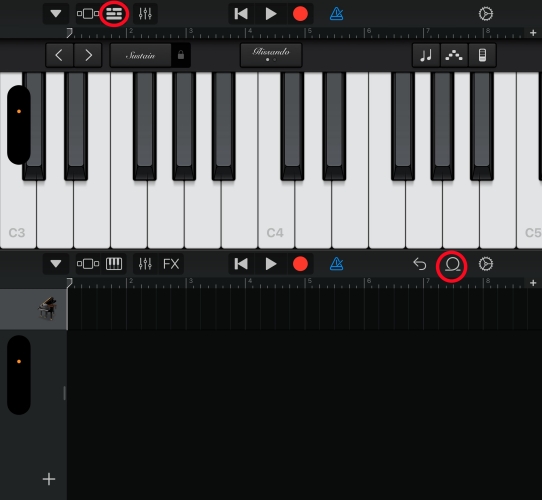
Step 3. Tap the Tracks icon in the top-left corner to switch to the timeline view.
Step 4. Tap the Loop Browser icon in the top-right corner and select the Files tab.
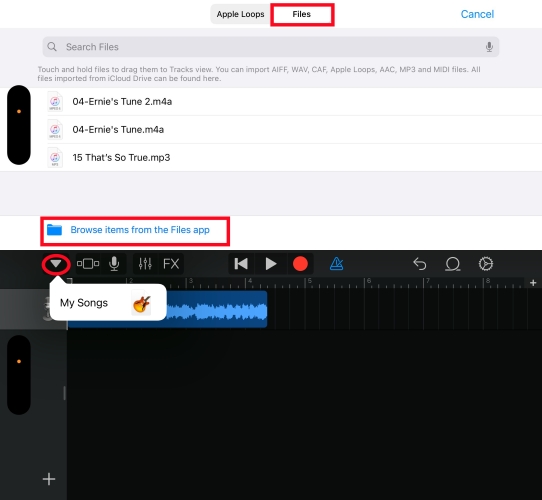
Step 5. Tap Browse items from the Files app to find your converted song.
Step 6. Drag and drop the converted music file onto the timeline.
Step 7. Drag the left and right edges of the audio block to trim the song to your favorite 30-second section.
Step 8. Tap the downward arrow in the top-left and select My Songs to save the project.
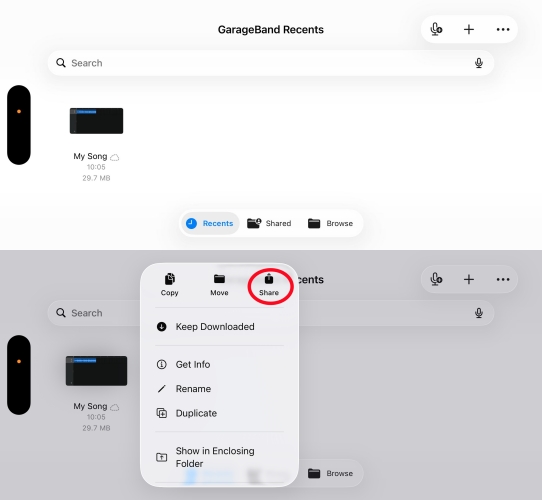
Step 9. Tap and hold your saved project, tap Share, and then select Ringtone.
Step 10. Name your ringtone and tap Export.
Method 3. Make a Ringtone via iTunes/Finder (For Trimming & Transferring)
Creating a custom iPhone ringtone using iTunes on a Windows PC or Finder on a Mac is a classic method. Because Apple restricts custom ringtones to a maximum of 30 seconds and requires a specific .m4r format, you will need to trim and convert the track first. Here you can use iTunes or Finder to trim the converted song, then transfer it to your device for use.
Step 1. Open iTunes and locate the song you want to use in your library.
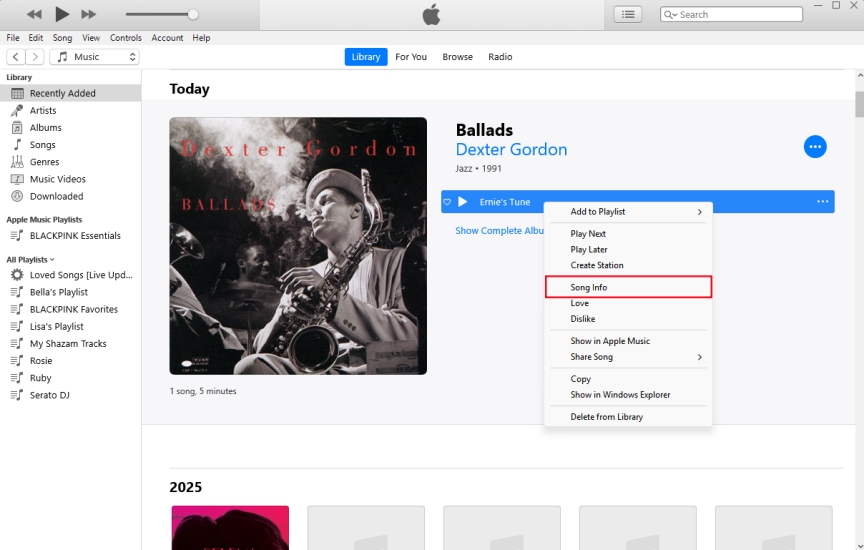
Step 2. Right-click the song, select Song Info, and click the Options tab.
Step 3. Check the Start and Stop boxes and enter the exact time range of the section.
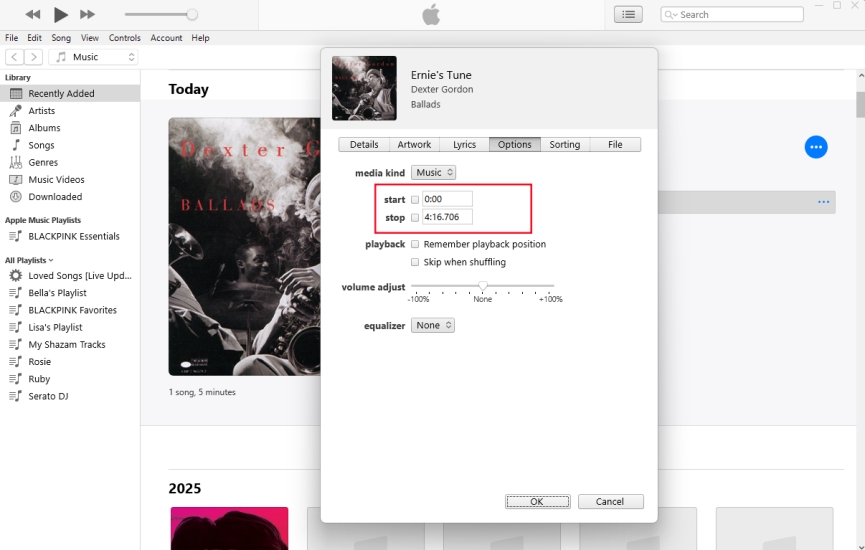
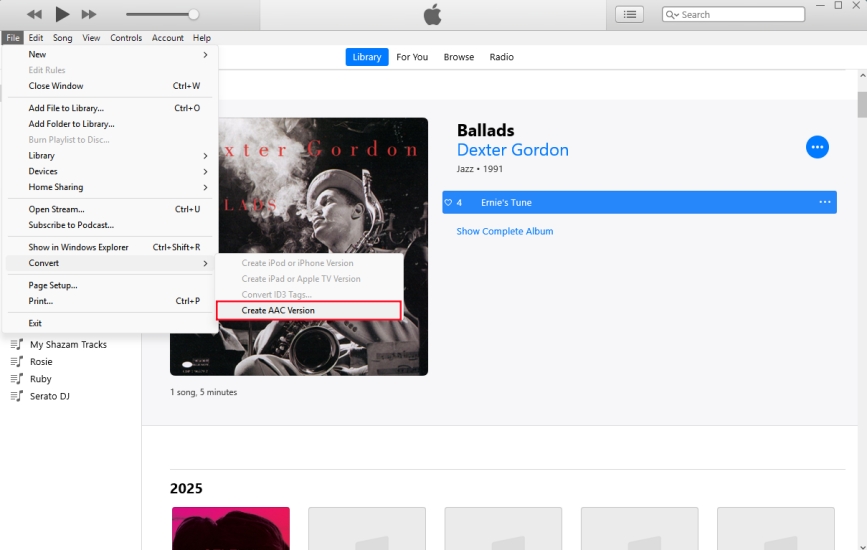
Step 4. Click OK to save the change, then go to the top menu and click File > Convert.
Step 5. Select Create AAC Version to create a new, shortened version of the track.
Step 6. Right-click the newly created, short AAC track and select Show in Windows Explorer.
Step 7. Right-click the file in your system folder and select Rename.
Step 8. Change the file extension at the end of the name from .m4a to .m4r.
Step 9. Connect your iPhone to your computer using its USB cable.
Step 10. In iTunes, click on the iPhone icon in the top-left toolbar to view your device details.
Step 11. In the left sidebar under On My Device, click on Tones.
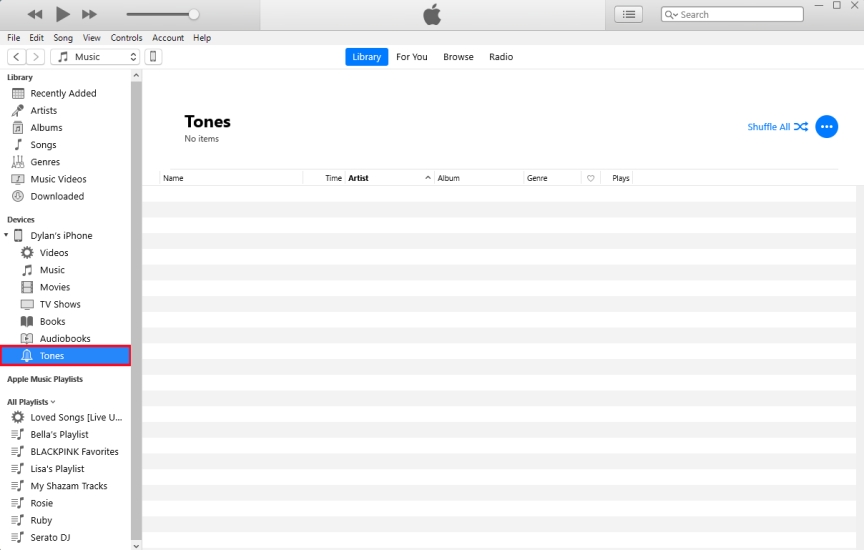
Step 12. Drag and drop your newly renamed .m4r file into the Tones window in iTunes.
How to Set Your Custom Apple Music Ringtone
Once you have exported the Apple Music song using either method above, applying it as your ringtone is simple.
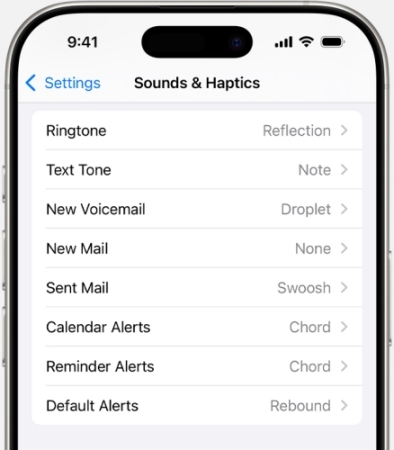
Step 1. Open Settings and tap Sounds & Haptics > Ringtone.
Step 2. Find your newly created song at the very top of the list under the Ringtones header.
Step 3. Simply tap it to set it as your default ringtone.
Part 4. How to Use Apple Music as Ringtone on Android Devices
For Android users, you can directly transfer the newly converted MP3 files onto your Android phone's local storage by connecting your device to the computer with a USB cable or uploading to cloud services like Google Drive. Once the file is saved locally on your Android phone, you can quickly set it as your ringtone through your device's settings.
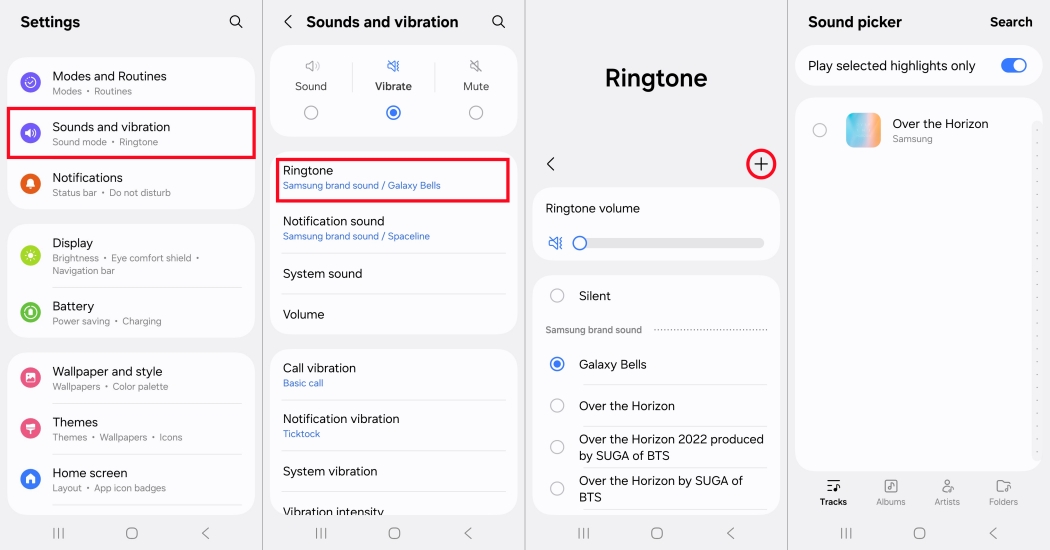
Step 1. Open your phone's Settings app.
Step 2. Tap Sound & vibration or Sounds and haptic feedback.
Step 3. Select Phone ringtone or Ringtone.
Step 4. Tap Add Ringtone or select My Sounds / On this device.
Step 5. Browse your internal storage and locate the transferred MP3 file.
Step 6. Select the MP3 file and tap Save or Done.
Part 5. Conclusion
It's not that hard to set Apple Music as a ringtone. Apple Music is in an encrypted format, so all you need to do is convert Apple Music to MP3 format for setup. TunesMake Streaming Audio Recorder is the key tool. With it, you can download and convert Apple Music for adding it to your iPhone or Android phone and setting it as a ringtone.
Related Articles

A professional writer at TunesMake, crafts in-depth tutorials, practical tips and expert advice focusing on streaming music, technology, and more.
- 1
- 2
- 3
- 4
- 5
- 6
- 7
 Leave Your Comment
(0)
Leave Your Comment
(0)

 Download Center

