
All the songs and playlists in your library are finished? Are you tired of the same existing tracks? Why not utilize the curated features? Apparently, streaming services like Tidal make it easy to discover more similar songs based on your taste by turning Tidal Autoplay on. As Tidal boasts over 100 million songs, you can take advantage of the Autoplay feature to let Tidal deliver surprising yet non-stop music for you. Handy! If you want to have a better understanding of Tidal Autoplay, including what is it, how it works, and how to use it, you can not miss this article. Even though you have encountered issues like Tidal Autoplay not working, you can find available solutions here. Now, just read on to keep yourself grooving!
Part 1. What Is Tidal Autoplay?
Tidal Autoplay is a feature enabling you to explore more undiscovered content on Tidal. When you turn it on and reach the end of your play queue, Tidal automatically continues to play similar songs so the music never stops. Take it easy, the suggested tracks Tidal offers are based on what you’re playing currently, and surely they are tailored to your liking. If your Tidal Autoplay is off, then the playback will pause when you reach the end of a song. So you have to manually play the next track.
This feature is available for all Tidal listeners, and you can enable it on both the mobile and desktop versions of the Tidal app. Whether you're relaxing at home or hosting a party, Tidal Autoplay keeps the music going, ensuring that you never miss a beat.
Part 2. How to Turn on/off Tidal Autoplay on iPhone/Android
If you are accustomed to using Tidal on your iPhone or Android device, you may find that the Autoplay functionality in Tidal kicks in when the playlist or album is going to end. If you disabled it before, the tutorial below can help you to enable it.
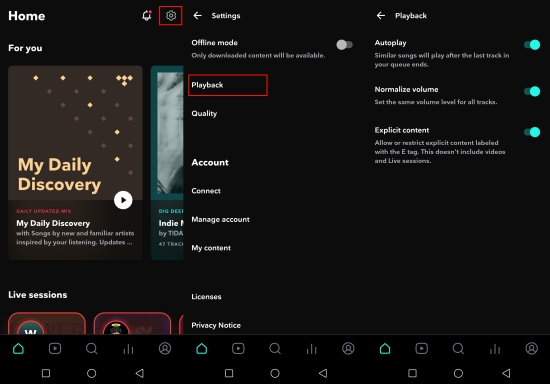
Step 1. Run the Tidal app on your phone and go to Settings in the top-right corner.
Step 2. Select the Playback option and switch the Autoplay toggle on.
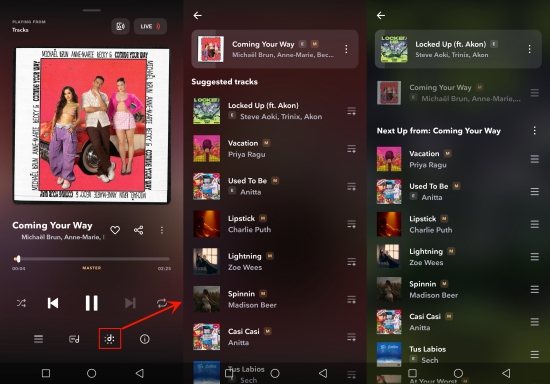
Step 3. Now, start playing any song and you will get the Autoplay listening.
Step 4. From the Now Playing screen, tap the note icon and you can see suggested tracks Tidal recommends to you. Tap the play queue icon and you will find similar songs are waiting to play.
Step 5. To toggle this feature off, just tap the Autoplay button again.
Part 3. How to Turn on/off Autoplay on Tidal Desktop
For users who enjoy high-fidelity music on a bigger screen, computer is a good choice. On the official Tidal web player or its desktop app, you can enjoy the Autoplay feature as well. Here’s how to enable or disable it on your computer:
Step 1. Launch the Tidal app installed on your Windows or Mac computer. Or, you can open any browser to enter the Tidal web player.
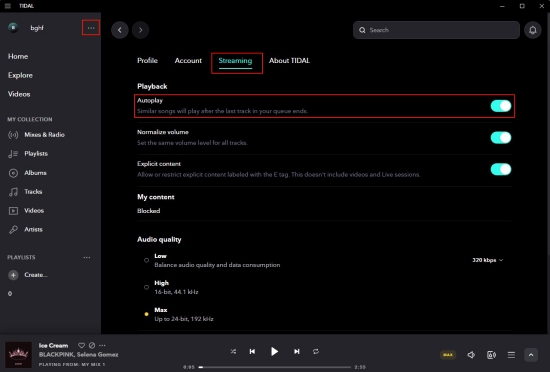
Step 2. Click the three-dots icon at the top left corner, then choose Settings.
Step 3. Go to the Playback tab to toggle on the Autoplay button.
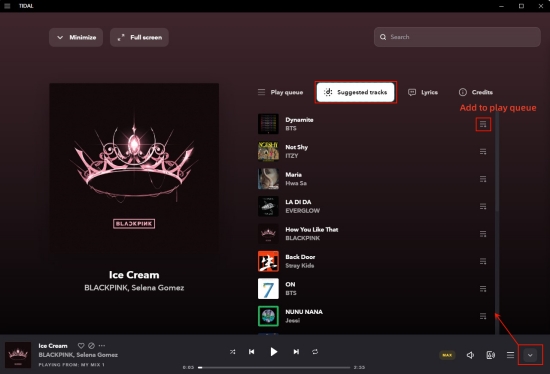
Step 4. When you are playing a track or playlist, hit on the Eject button and you can see the Suggested tracks section.
Step 5. If you click the Add to play queue button next to the suggested track, it will be played next.
Step 6. To turn off the Tidal Autoplay feature, simply click the button again.
Part 4. How to Fix Tidal Autoplay Not Working
it broke the ‘Autoplay’ option (so that similar songs will just continue to play). This makes Tidal useless for me as it just stops after a song is over and I have to keep driving. What to do? Hopefully there is a solution, thanks!”
— User from RedditThe Tidal Autoplay feature is easy to access on both computers and your mobile phones. However, many users have reported the Tidal Autoplay not working issue. If you find the Autoplay feature not working as expected, there are some troubleshooting tips you can use to resolve this issue. You can try the following solutions to ensure your smooth and continuous playback.
Solution 1. Disable the Repeat Mode on Tidal
If you activate the repeat one mode on Tidal, then Tidal will continuously play the same song over and over again. With the steps below, you can easily disable it to let Autoplay continue.
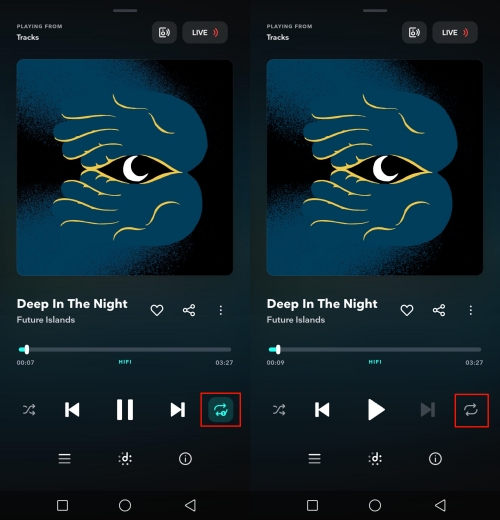
Step 1. Start playing on Tidal to access the Now Playing screen or the Now Playing bar.
Step 2. Hit on the Repeat One button to turn it off.
Solution 2. Confirm a Stable Network
Autoplay issues can also be caused by unstable Internet connections. Since Tidal relies on a stable network connection, network issues can prevent the next song from loading automatically. Please ensure that your Wi-Fi or data connection is stable. When there is an Internet issue, you can switch to a more reliable connection or restart your router.
Solution 3. Check Your Tidal Account Status
In some cases, the Tidal Autoplay feature will stop working when there are issues with your Tidal account status. The most important thing is to ensure your Tidal subscription is active, and there are no payment issues. If your Tidal subscription expires or is downgraded, certain features like Autoplay might not work correctly. You can also try to log out and log back into your Tidal account on the app or website again.
Solution 4. Clear Tidal Cache
Overloaded caches have the ability to make a conflict with your app. Deleting caches regularly can not only improve the performance but also fix some issues, such as this Tidal Autoplay not working issue.
Solution 5. Update or Uninstall the Tidal App
If the Autoplay still not working on your device, it could be due to a bug or outdated app version. It’s always a good idea to update the Tidal app on the App Store or Google Play Store regularly since the new version of the Tidal app often contains bug fixes and performance improvements. However, if there is no new Tidal app, uninstalling and reinstalling the Tidal app can also be a helpful solution. This step can help resolve any corrupted files or settings that might be affecting Autoplay.
Solution 6. Change the Wireless Connection Method
Many users have found that the Tidal Autoplay not working issue often happens when listening to songs on other players via the Tidal Connect. Tidal Connect may interfere with the app’s ability to stream and load new songs. In this case, you can try to use another wireless connection method, such as Bluetooth.
Part 5. How to Autoplay Tidal Music on Other Devices Freely
These solutions should help you get Tidal Autoplay back up and running. If none of these works, here is an ultimate method to ensure your seamless music experience. That is to download your preferred Tidal songs locally and play them on other media players that have the Autoplay feature you like. However, when you try to do so, you will be prevented by Tidal’s DRM protection. Due to this restriction, you are not able to play Tidal songs on other platforms even if you have downloaded them. Thus, here we recommend a powerful music converter – TunesMake Tidal Music Converter.
As a professional music converter, TunesMake Tidal Music Converter is popular among all Tidal users. It helps you download and save Tidal songs, playlists, albums, and podcasts to your computer locally by converting Tidal songs to FLAC, MP3, AIFF, M4A, M4B, and WAV formats. With top-leading decryption technology, it ensures 100% lossless audio quality and full ID3 tags. So, you can better manage Tidal songs even on other players and devices. Here’s how to download Tidal songs for listening and controlling.

TunesMake Tidal Music Converter –
Download and Convert Tidal Songs as Local Files
- Download any Tidal content, including songs, albums, playlists, and artists
- Convert and save Tidal music to MP3, FLAC, AIFF, WAV, M4A, and M4B
- Preserve a whole set of ID3 tag information in the downloaded Tidal songs
- Handle the conversion of Tidal music up to 22X faster speed and in batch
Security Verified. 100% Clean & Safe.
Step 1
Pick and Add Tidal Songs to TunesMake
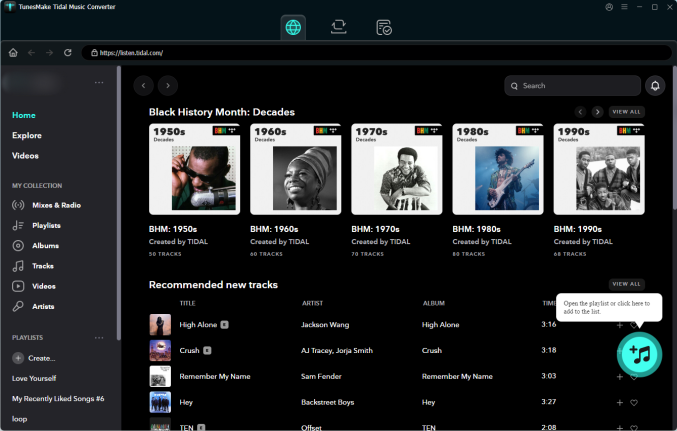
Install and launch the TunesMake Tidal Music Converter on your computer, and the official Tidal web player will be loaded automatically. Here you can log in to your Tidal account and find any playlist or album you like. Select this playlist or album, and then click the Add icon > Add to List. Once done, all the songs on this playlist or album will be loaded to the TunesMake’s conversion list.
Step 2
Configure the Output Format
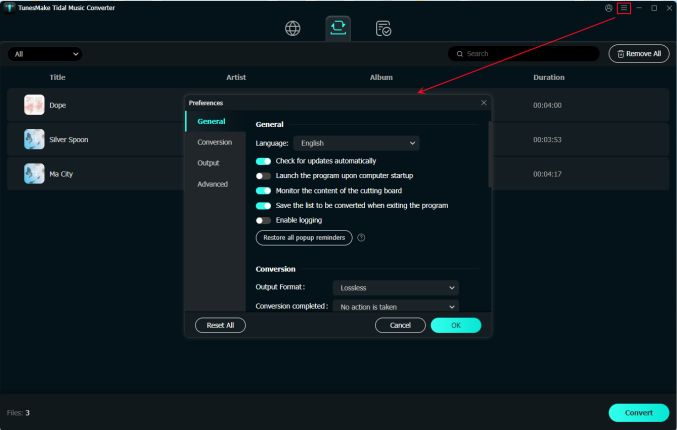
Now, all added songs will be displayed on the main window of TunesMake. Click the menu icon in the upper right corner and select Preferences. On the pop-up window, switch to the Convert tab to customize the output format, channel, sample rate, and bit rate. To fully control Tidal songs, retain the default MP3 format. If you make other changes, don’t forget to click OK.
Step 3
Download Tidal Songs Locally
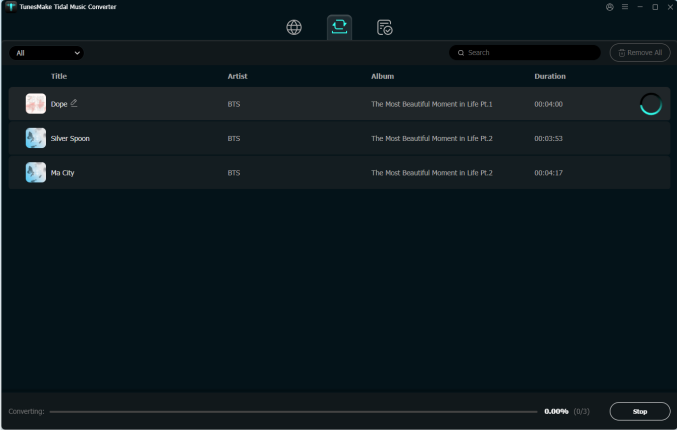
When everything is ready, hit the Convert button and TunesMake will finish the conversion in a few seconds. Once the conversion is done, go to the Converted history list to browse all your converted Tidal files. You are allowed to use the search icon next to each song to locate them in your computer’s local folder. After you double-click the Tidal music file, it will be opened and played with the built-in media player. Here you can freely back and forward it. Shuffling or repeating is up to you.
Part 6. Conclusion
Use the above guide to let Tidal Autoplay pick what plays next! If your Tidal Autoplay cannot work properly, check the troubleshooting tips carefully to fix it. When these solutions not working or you are not satisfied with the Tidal Autoplay feature, you can choose to play Tidal songs on other media players. All you need to do is download your favorite Tidal songs as local files via the TunesMake Tidal Music Converter. After that, you are able to play Tidal on-demand on any player without ads or without issues.
Related Articles


An experienced freelance writer at TunesMake, specializes in using various streaming services from Spotify, Apple Music, to Amazon Music, and more other platforms.
- 1
- 2
- 3
- 4
- 5
- 6
- 7