
Sharing Apple Music to discord like Spotify. As Someone who uses discord all day everyday it would be cool to be able to connect Apple Music to discord so share with my friends as I don’t use Spotify and not really planning on to.
- User from the Apple CommunityIn a world where music has become an integral part of our lives, sharing our favorite tunes with friends and communities has never been easier. Discord, a popular platform for gamers and communities, enables you to share your preferred music and create the perfect atmosphere for your conversations and gatherings. For example, you can connect your Spotify account to Discord and enjoy your favorite music with just few clicks on Discord. Currently, most folks are waiting for the Apple Music Discord integration and are eager to connect Apple Music to Discord. It is a pity that there is still no relevant plan that has been heard of. But you don’t need to worry. In this article, we will walk you through how to connect Apple Music to Discord via 4 helpful workarounds. By following the tutorial below stepwise, your online music experience on Discord more harmonious. Without further ado, let’s explore them together!
Method 1. How to Show Apple Music on Discord by Uploading [Purchased Songs]
As mentioned above, there is no official collaboration between Apple Music and Discord. Thus, you cannot listen to Apple Music songs on Discord directly. However, Discord allows users to upload local files for sharing while chatting with others. That is to say, if you have some purchased DRM-free iTunes music files, you can upload them to Discord for listening and sharing.
But you need to notice that there is a limitation on the uploading process. All users are only allowed to upload local files without exceeding 8MB. If you want to upload files up to 100MB in size, you can compress them into a ZIP or RAR archive. Or you can upgrade to Discord Nitro to remove this limitation. Now go download your purchased songs and follow the steps below to enjoy your Apple Music songs on Discord.
How to Download Purchased iTunes Songs
On Windows/Mac:
Step 1. Launch the iTunes app on your Windows computer or the Apple Music app on your Mac.
Step 2. Then, head to iTunes Store. It is located in the sidebar of the Apple Music app and the top toolbar of iTunes.

Step 3. Then, click Purchased. Here you can see all the songs and albums you’ve purchased.
Step 4. Select any song you want to enjoy on Discord, and download it by clicking the Download icon next to it.
On iPhone/iPad:
Step 1. Open the iTunes Store app on your iOS device. Then, tap the More icon.
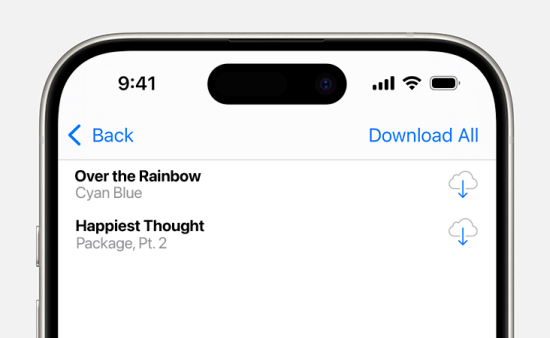
Step 2. Select Purchased > Music.
Step 3. Here you can download any individual song by tapping the Download icon. Or, you can download all your purchased songs by selecting the Download All option.
How to Upload Downloaded Music Files to Discord
On Windows/Mac:
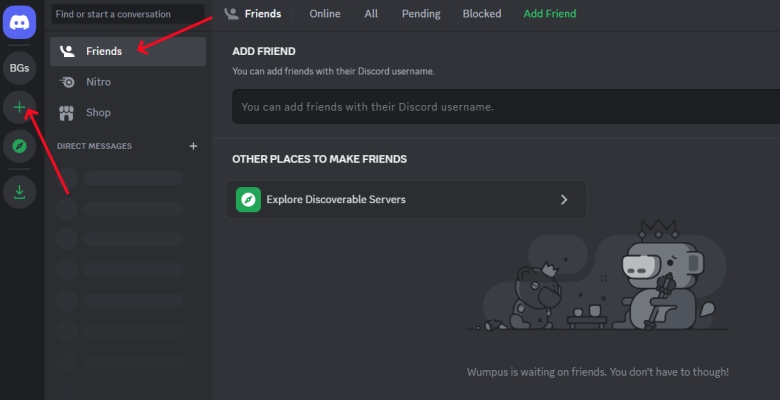
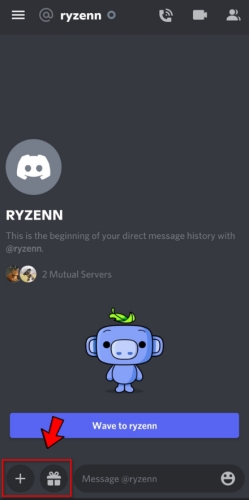
Step 1. Navigate to the official website of Discord or launch the Discord app on your computer.
Step 2. Click the Direct Messages button to select a friend to share your Apple Music songs with. Or click the Add a Server button to create a channel for sharing with friends.
Step 3. In the chat box, click the + button and select Upload a File from the pop-up window.
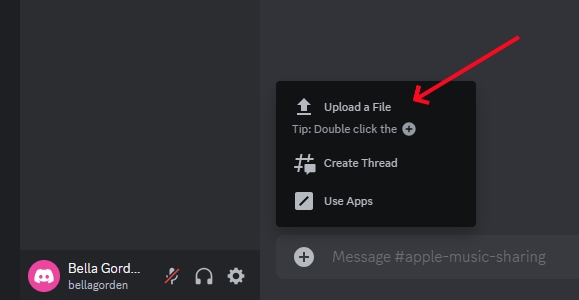
Step 4. Find your downloaded Apple Music files and click the Open button.
Step 5. Continue to press the Enter button on the keyboard to share.
On iPhone/Android:
Step 1. Launch the Discord app on your iPhone or Android device.
Step 2. Tap the + button to create a channel to share your Apple Music songs. Or tap the Direct Messages button to join a text channel.
Step 3. In the chat box, tap the + button at the bottom left corner of the screen.
Step 4. From the pop-up window, tap the document icon, then head to the folder where you store your Apple Music songs.
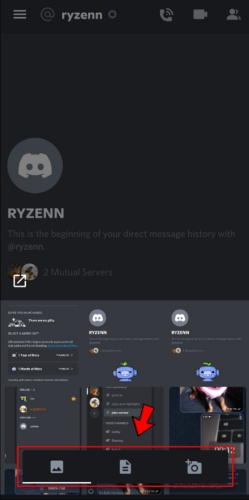
Step 5. Select your Apple Music songs on your device and start sending them to your friend.
Method 2. How to Connect Apple Music to Discord via Rich Presence
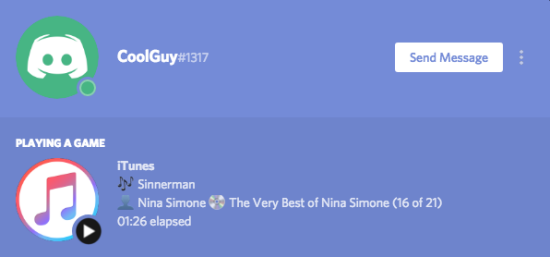
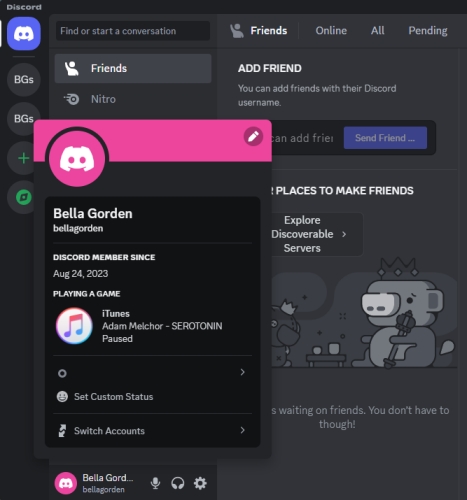
Some users are looking for a dynamic way to show what they are listening to on Apple Music while chatting or gaming on Discord. Due to the lack of Apple Music Discord integration, you should utilize Rich Presence to do so. Rich Presence can let Discord display the real-time details of your currently playing Apple Music songs in your profile. According to the Rich Presence you choose, it can show song titles, artist, album cover, and so on. In the following content, we have collected 3 reliable tools. You can use them to link Apple Music with Discord without hassles.
Option 1. iTunesRichPresence
iTunesRichPresence is one of the most popular tools for personalizing your Discord status on the basis of what you are listening to on Apple Music. It will show the song title, artist name, album name, and when the song is started playing, etc. This lightweight tool works on both Windows and MacOS.
Step 1. Visit the official GitHub page of iTunesRichPresence and download the correct version for your operating system from the Releases section, which is on the right sidebar.
Step 2. Once done, double-click the .dmg or .exe file to run it on your computer. You should follow the on-screen prompts to finish the setup settings.
Step 3. After that, launch Discord and ensure the Rich Presence feature is enabled.
Step 4. Once iTunesRichPresence is running and your music source is set up, you can play any Apple Music song you like. The app will automatically sync with Discord, and you can find the Apple Music status by clicking your username.
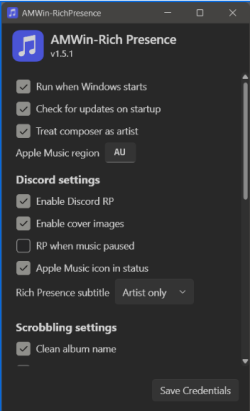
Option 2. AMWin-RP
AMWin-RP is another popular Discord Rich Presence. But it is designed specially for users who are using the Apple Music app installed from the Microsoft Store. Other versions of Apple Music are not supported. This tool offers a cleaner interface and native Windows 10/11 support.
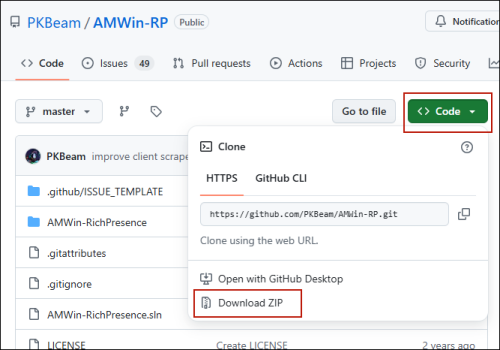
Step 1. Open your browser app and visit the AMWin-RP GitHub page.
Step 2. Click Code at the top, then select Download ZIP to get the latest release.
Step 3. Once done, unzip the file and place the contents in the local folder of your Windows computer. Then, you can open the .exe file to run the app.
Step 4. Open the Apple Music app on your desktop to play any song. AMWin-RP will fetch your current song data and update it to your Discord profile.
Option 3. Discord Music Presence
If you want a more customizable and universal Rich Presence, Discord Music Presence is a great choice. Apart from Apple Music, it supports various music streaming services, including Spotify, Tidal, and so on. When you playing music on your music app, this tool will automatically detect the music information and show it on your Discord status.
Step 1. Visit the Discord Music Presence page on GitHub. Then, you can click the version you need and download the tool.
Step 2. If you are using Windows, simply pick the .exe download. On Mac M1/M2/M3, you need to pick the Apple Silicon download. If you are using an Intel Mac, and you need to click and download Intel x86_84.
Step 3. When the tool is downloaded, you need to double-click it and follow the wizard instructions shown on the screen.
Step 4. After you install the Discord Music Presence, you can see its icon in the bottom menu of your desktop. Click the icon to launch it.
Step 5. Now you can play a song on Apple Music, and it will appear in the menu. You can see the track info is displayed in your Discord account.
Method 3. How to Stream Apple Music on Discord with Discord Bots
Rich Presences don’t work every time. If they fail to connect your Apple Music to Discord, you should consider using other alternative methods. For example, Discord Bots. These bots ensure you access your music library in Apple Music while using Discord. Let’s dive into the details.
Jockie Music
Jockie Music is multi music bot that supports a series of streaming music services, including Tidal, Deezer, Apple Music, Radio, SoundCloud, Mixcloud, and Bandcamp. This bot offers lots of features such as volume control, song requests, playlist management, and live streaming support from radio stations, to users. If you are looking to connect Apple Music to Discord, then you can try using this Discord bot.
Access Link: https://top.gg/bot/411916947773587456
Neeko
Neeko is the best music bot on Discord for playing music from Apple Music, iTunes, Spotify, Deezer, Tidal, SoundCloud, and more. Using Neeko is the easiest way to play music on your server on Discord. Once you add this bot to Discord, you can add as many as a song you want to the queue for playing. In addition, you can create your liked playlist by adding your favorite songs. To connect Apple Music to Discord, you can also use Neeko.
Access Link: https://top.gg/bot/543771182936358912
How to Use Discord Bot for Apple Music
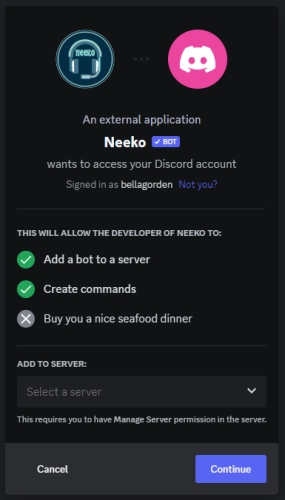
Step 1. Navigate to the link of your chosen Discord bot for Apple Music and click the Invite button.

Step 2. Select your server, click the Continue button, and then click the Authorize button.
Now you can listen to Apple Music songs on your service by using this Discord bot. But sometimes, it would happen that it fails to connect Apple Music to Discord via a bot.
Method 4. How to Add Apple Music to Discord via Spotify [All Songs]
Since Discord offers native integration with Spotify, one of the easiest and most stable ways to play Apple Music on Discord and show your Apple Music activity is by syncing your Apple Music library with Spotify. As long as you download your Apple Music songs as local music files, you can upload them to Spotify for playing on Discord seamlessly. You can also see your Listening on Spotify status automatically. To do so, the most important step is to remove the DRM protection from Apple Music. Luckily, there are potent methods to remove this limitation. All you need is a professional Apple Music converter that can help you download all Apple Music songs locally.
You cannot miss the TunesMake Streaming Audio Recorder. It is one of the best Apple Music converters on the Internet and has been relied on by many people worldwide. With its decryption technology, you can easily download Apple Music songs, playlists, albums, and podcasts as DRM-free music files in plain audio formats, including MP3, M4A, M4B, WAV, FLAC, and AIFF. During the downloading process, the original sound quality and ID3 tags will be kept, so that you can still have a great listening experience as online. After downloading, it’s a piece of cake for you to save the downloaded music files permanently and listen to them on diverse platforms as you wish. To play and share Apple Music on Discord, TunesMake Streaming Audio Recorder can strip all obstacles.

Streaming Audio Recorder –
Download Streaming Music to MP3 on PC and Mac
- Unlimitedly download streaming music songs, playlists, and podcasts
- Losslessly convert streaming music to MP3, M4A, M4B, WAV, FLAC, and AIFF
- Remove DRM protection from many streaming music platforms
- Convert streaming songs with original sound quality and ID3 tags kept
Security Verified. 100% Clean & Safe.
How to Download and Convert Apple Music Locally
It’s pretty easy to convert Apple Music for playing on Discord by using TunesMake Streaming Audio Recorder. First, download and install TunesMake Streaming Audio Recorder on your computer via the Free Download button above. Then, follow the steps below to start the conversion of Apple Music to MP3.
Step 1
Import Apple Music to TunesMake Software
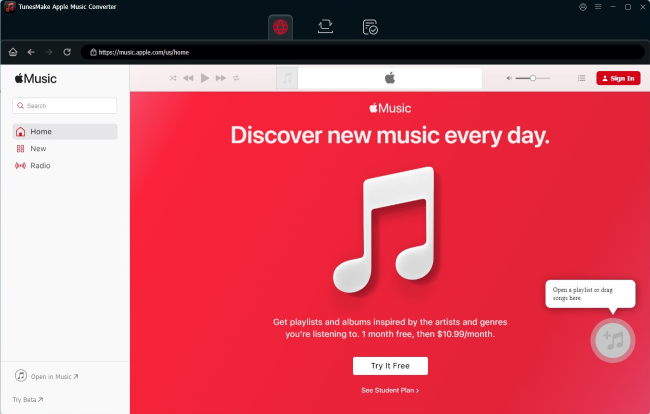
Launch TunesMake Streaming Audio Recorder, then it will automatically load the official Apple Music web player on its interface. You should go to select the songs or playlists you want to share or play on Discord. Select a playlist, and then click the lower Add icon. Then, select Add to List so that you can load all the songs from this playlist to TunesMake’s conversion list.
Step 2
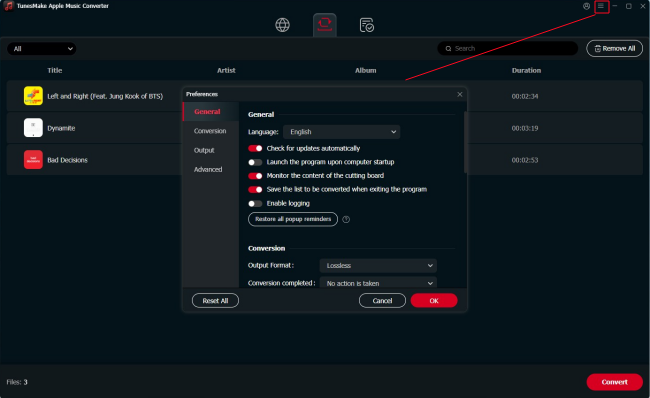
Set the Audio Parameters for Apple Music
TunesMake software allows users to personalize the output audio parameters. To open the settings window, click the top Menu icon > Preferences. If you want to set the output format settings, you need to switch to the Convert tab. Here you can choose MP3 as the output format. You can also change other parameters, such as channel, bit rate, and sample rate. Don’t forget to keep your changes by clicking the OK button.
Step 3
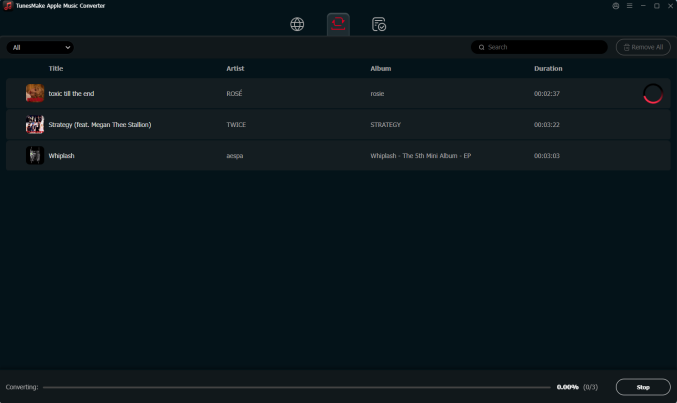
Start to Convert Apple Music to MP3 Files
It’s time to convert Apple Music to unprotected music files. Now you can click the Convert button to initiate the conversion of Apple Music to MP3 for playing on Discord. Wait for a while, and TunesMake software will convert and export Apple Music songs as MP3 files to your computer. When the conversion finishes, you can click the Converted icon to browse all the converted Apple Music songs. Furthermore, you can click the file icon at the rear of each track and locate the folder where you choose to save the converted music files.
How to Add Apple Music to Discord via Spotify
All Apple Music songs have been converted to a playable format compatible with Spotify. Now you can upload Apple Music local files to Spotify for playing on Discord. Follow the below steps to upload Apple Music songs to Spotify for playing on Discord.
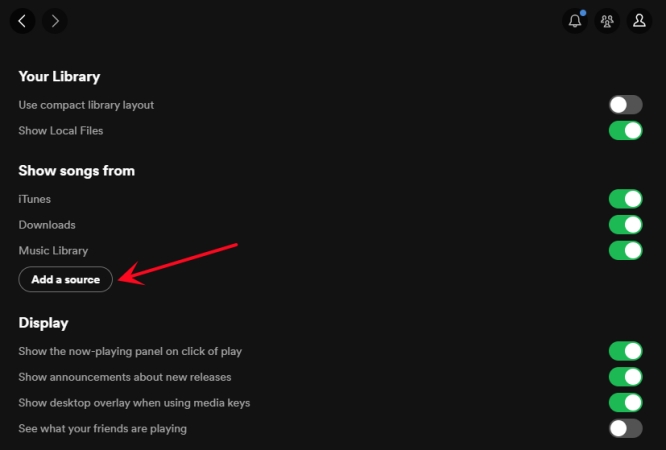
Step 1. Launch Spotify on your computer, then head to Menu > Edit > Preferences.
Step 2. Scroll down to Your Library, turn Show Local Files on, and click Add A Source to select the converted Apple Music files.
Step 3. Click the Open button to upload your converted Apple Music files and close the Spotify app.
Step 4. In Discord, click the Connections button in the menu on the left and select Spotify.

Step 5. A web page opens to log in to your Spotify account and start playing your Apple Music songs.
Note
If you don’t need to save all the Apple Music songs as local files, you can choose to transfer your Apple Music playlist to Spotify. There are some third-party tools can help you to achieve your goal. But you need to know that not every single song can be transferred successfully.
Conclusion
In the above discussion, we’ve introduced several ways to play Apple Music on Discord. You can try them one by one. Well, we’d like to suggest you use TunesMake Streaming Audio Recorder. With this all-in-one audio converter, you can download and convert Apple Music songs for playing without the Apple Music app, let alone playing Apple Music on Discord. Hope this article can help you out. Leave your comment if you have any other problems.
Related Articles


A professional writer at TunesMake, crafts in-depth tutorials, practical tips and expert advice focusing on streaming music, technology, and more.
- 1
- 2
- 3
- 4
- 5
- 6
- 7