








 Store
Store


If you're trying to stream your favorite playlist or download an album offline, encountering an Apple Music device limit reached notification can instantly stall your listening. Whether you've seen a warning that you've hit your device cap or received a prompt stating that you are listening on another device, this error is one of the most common hiccups for Apple Music subscribers. The good news? Resolving this issue takes only a few minutes once you understand which limit you've encountered and how to clear your account's device queue.
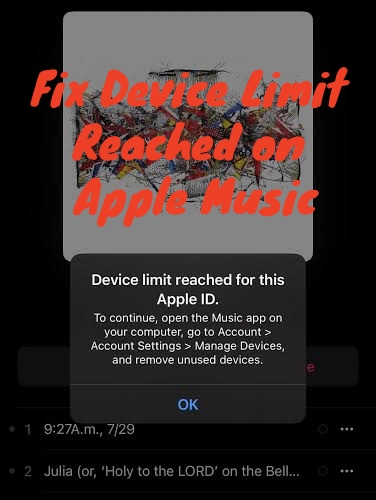
Part 1. Why Did You See Device Limit Reached for This Account?
Apple Music enforces strict controls to manage account access and copyright compliance. When you hit a wall, it is almost always due to one of three distinct boundaries.
- Associated Device Limit: You can have up to 10 devices associated with your Apple ID for downloads and offline music playback.
- Computer Authorization Cap: Apple caps this total at 10 devices, of which no more than 5 can be computers.
- Concurrent Streaming Limit: An Individual or Student Plan allows active music streaming on only one device at a time.
To effectively fix the issue, you must identify whether you have hit the associated and authorized device cap or the simultaneous playback limit.
1. Associated Device Limit (10 Devices Total)
When you download songs, albums, or music videos for offline listening, Apple links that device to your Apple ID. Your account can have a maximum of 10 associated devices at any given time. If you replace your smartphone, tablet, or secondary devices regularly, inactive devices can remain linked in the background and clog these slots.
2. Computer Authorization Cap (5 Computers Max)
Beyond mobile devices, Apple imposes a sub-limit specifically on desktop computers. You can authorize a maximum of 5 computers to play purchases and stream media through your Apple ID. Even if you haven't reached 10 total devices, hitting 5 authorized computers will block you from adding another computer.
3. Active Simultaneous Streaming Cap (1 vs. 6 Streams)
If your music suddenly stops and displays an error message stating that your account is being used elsewhere, you haven't exceeded your storage device limit. You have hit the concurrent stream cap.
- Individual & Student Subscriptions: Restricted to 1 active stream at a time.
- Family Subscriptions: Support up to 6 independent streams at once.
Part 2. How to Fix Device Limited Reached on Apple Music
Getting hit with a prompt saying Device Limit Reached for This Account can immediately halt your music session. To remove this error prompt, you can remove associated devices, deauthorize obsolete computers, or choose the subscription tier that fits your listening habits.
Method 1. Remove Associated Devices from Apple Music
If you download music for offline playback, Apple tracks every iPhone, iPad, Mac, and PC attached to your account. When you reach the 10-device limit, you must remove old or unused devices to free up instantly accessible slots.
Option 1. Manage Devices on iPhone & iPad
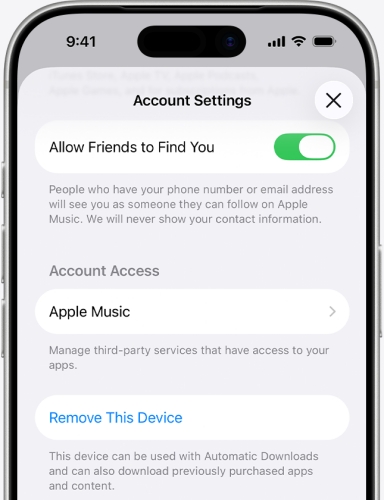
Step 1. Open the Settings app on your iPhone or iPad.
Step 2. Tap your Apple ID name at the top of the menu.
Step 3. Tap Media & Purchases, then select View Account.
Step 4. Scroll down to locate your linked hardware list.
Step 5. Tap Remove This Device to unlink any unused device.
Option 2. Manage Devices on Mac
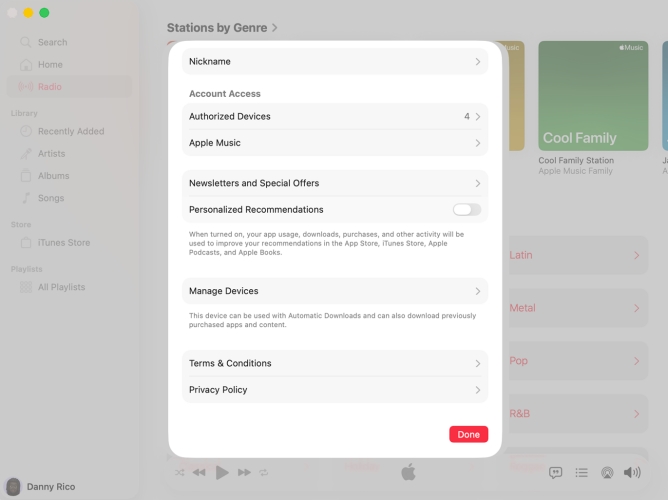
Step 1. Open the Apple Music app on your Mac.
Step 2. Click Account in the top menu bar and choose Account Settings.
Step 3. Authenticate with your Apple ID password if prompted.
Step 4. Scroll to the Downloads and Purchases section and click Manage Devices.
Step 5. Click Remove next to any device you wish to detach from your account.
Option 3. Manage Devices on Windows PC
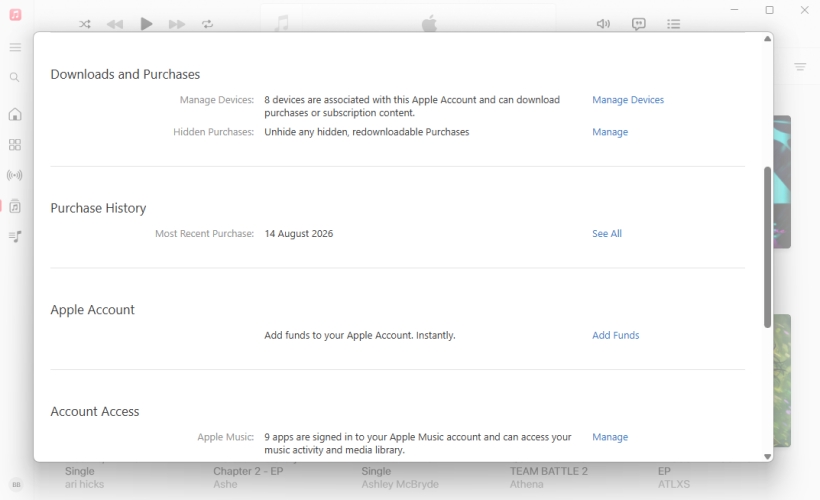
Step 1. Open the Apple Music app for Windows or iTunes.
Step 2. Click your profile icon or account name, then click View My Account.
Step 3. Under Downloads and Purchases, click Manage Devices.
Step 4. Select Remove next to any inactive device listed.
Method 2. Deauthorize Authorized Computers
In addition to general device associations, Apple restricts full account access to a maximum of 5 authorized computers at any given time. Simply logging out of the Apple Music app isn't always enough. You must formally deauthorize the computer.
Option 1. Deauthorize a Single Computer
If you still have physical access to the computer you want to remove, you can directly deauthorize it in the Apple Music or iTunes.
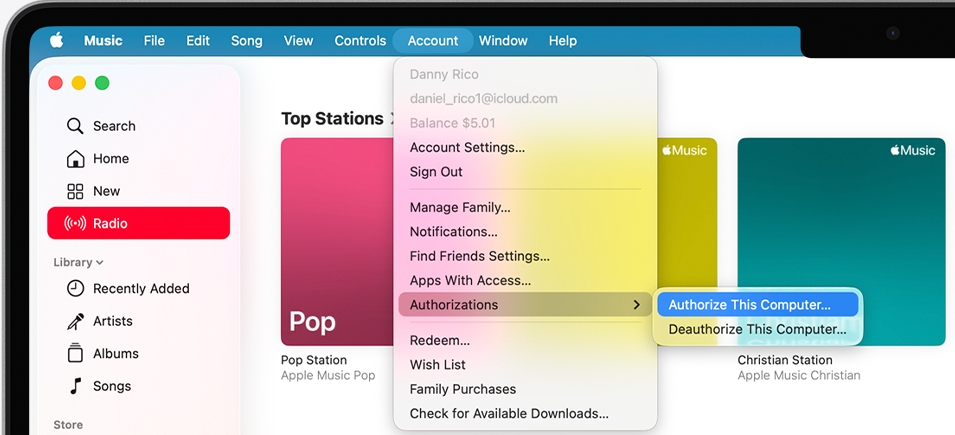
Step 1. Launch the Apple Music app or iTunes.
Step 2. Go to the top menu bar and select Account > Authorizations.
Step 3. Click Deauthorize This Computer.
Step 4. Enter your Apple ID password to confirm.
Option 2. Deauthorize All Computers
If an old Mac or PC broke, was sold, or is no longer accessible, you won't be able to deauthorize it directly. Apple provides a master reset option.
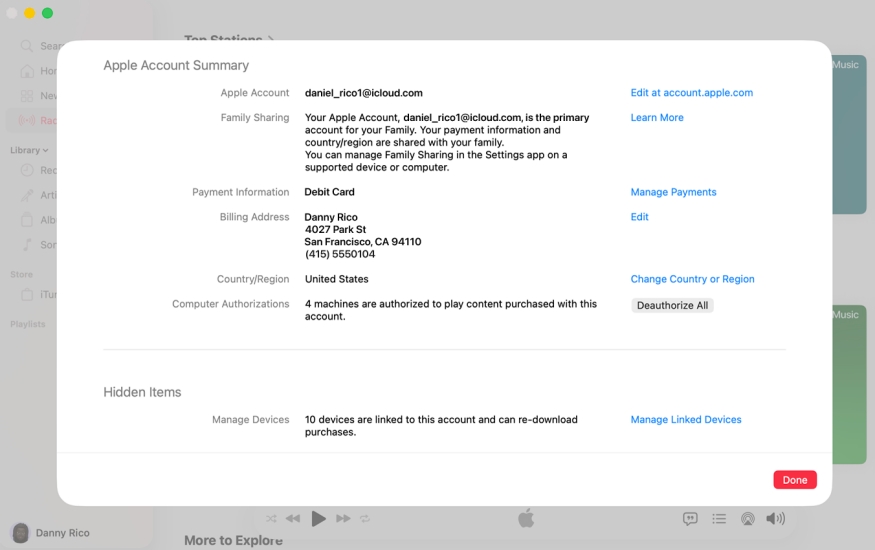
Step 1. Open Apple Music on your active computer and navigate to Account > Account Settings.
Step 2. Look at the Apple ID Summary section for Computer Authorizations.
Step 3. Click the Deauthorize All button on the right side.
Step 4. Once cleared, manually re-authorize the current computer you are using.
Note:
The "Deauthorize All" feature can only be executed once every 12 months. Use it carefully when you cannot individually access your old computers.
Method 3. Fix Concurrent Streaming Limits
If you see an error indicating that your account is playing music on another device, you do not necessarily need to delete a device. You need to manage active playback streams.
Option 1. Stop Playback on Secondary Device
Smart speakers like Apple HomePod or Amazon Echo, web browsers, and tablets often continue playing audio silently. Pause playback on those devices or close the Apple Music app background processes.
Option 2. Upgrade to the Apple Music Family Plan
If multiple people in your household use the same Apple ID, or if you regularly listen to music on separate devices at the same time, an Individual Plan will continually crash into stream limits.
- Upgrading to an Apple Music Family Plan allows up to 6 independent accounts to stream simultaneously.
- Each member receives their own personal music library, recommendations, and individual device associations.
Part 3. Ultimate Workaround to All Apple Music Limits
If you frequently run out of device slots or want to listen to your music on devices that don’t support the official Apple Music app, such as older MP3 players, car USB drives, or secondary laptops, converting Apple Music tracks for local playback is a practical workaround. Here TunesMake Apple Music Converter allows you to export your downloaded Apple Music tracks into open formats such as MP3, M4A, FLAC, AIFF, WAV, or M4B while preserving original sound quality and ID3 tag metadata.
Converted Apple Music track files play like standard local files on any media player, meaning you don't need to associate the playback device with your Apple ID. Also, it doesn't count toward your active streaming limits, letting you play music offline on one device while streaming online on another. Follow the steps below to download and convert Apple Music tracks with TunesMake.

Streaming Audio Recorder –
Download Apple Music tracks for playing anytime
- Download songs, albums, and playlists from Apple Music
- Convert Apple Music to MP3, M4A, M4B, WAV, FLAC, and AIFF
- Remove DRM protection from Apple Music completely and safely
- Preserve the original audio quality and ID3 tags for management
- Support downloading music from 10 popular streaming platforms
Security Verified. 100% Clean & Safe.
Step 1 Select Apple Music Tracks to Download
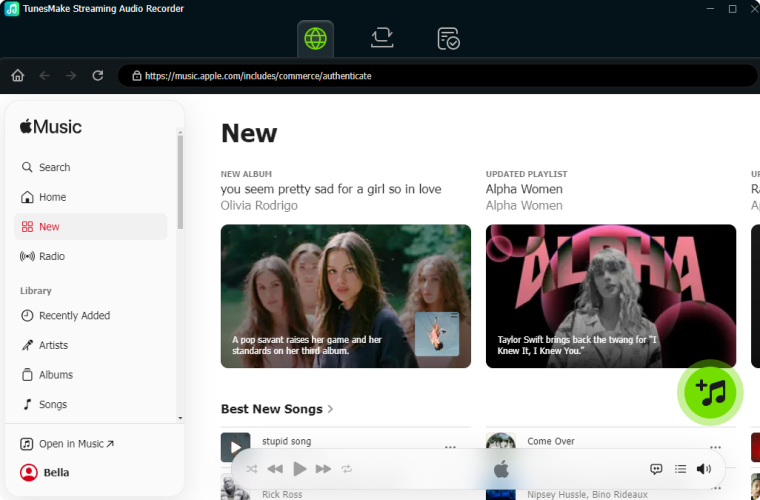
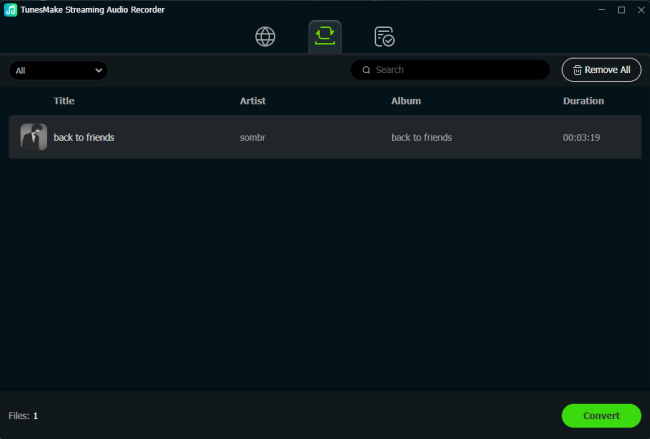
First of all, launch TunesMake Streaming Audio Recorder on your computer and click the Apple Music icon on the main interface. Then you will be redirected to a built-in Apple Music web player. Choose any music track, album, or playlist you want to download and click the + button to add them into the conversion list.
Step 2 Customize the Output Audio Parameter
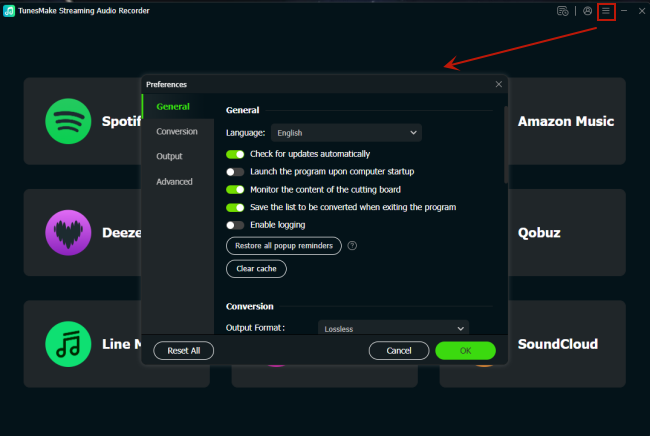
Once your target content are loaded, click the Settings button at the bottom left corner to open the settings menu. Here you can choose the output audio format you like. Other parameters like the sample rate, channel, and bit rate can also be customized. After setting well, go back to the main windows of the software.
Step 3 Start to Download Apple Music Tracks
Now you can click the Convert button at the bottom right corner of the screen. Wait for a little while, and all the added content music tracks will be converted to MP3 as local files. You can then browse all the converted Apple Music songs by clicking the Converted button. All the locally stored Apple Music track files can be played on any device.
Part 4. FAQs about Apple Music Device Limit Reached
How many devices can be on Apple Music at once?
You can associate up to 10 devices, including up to 5 computers with your Apple ID for offline music downloads. However, for simultaneous active playback, an Individual Plan restricts you to 1 device at a time, while a Family Plan allows up to 6 streams.
Does removing a device delete my downloaded music?
Removing an associated device from your account revokes its license to play downloaded Apple Music tracks offline. The downloaded files will either be removed automatically or become unplayable until the device is associated again with an active subscription.
How often can I deauthorize all computers?
Apple restricts the Deauthorize All function to once every 365 days. If you need to clear authorizations again before the year is up, you will need to contact Apple Support directly for assistance.
Part 5. Conclusion
Resolving an Apple Music device limit reached prompt comes down to managing your account's authorization slots and active streams. By routinely clearing out old phones, deauthorizing outdated computers, or upgrading to a Family Plan, you can ensure your music plays smoothly across all your devices without interruption. To get a playback of Apple Music on unlimited devices, converting tracks into local files through TunesMake is a better option.
Related Articles

A passionate writer specialized in creating engaging content about music and entertainment, covering everything from the latest music trends and entertainment news to practical tutorials.
- 1
- 2
- 3
- 4
- 5
- 6
- 7
 Leave Your Comment
(0)
Leave Your Comment
(0)

 Download Center

